Dronetag Beacon gen.2
Quick Start Guide
Welcome to the Dronetag Beacon Quick Start Guide! Thank you for choosing our product to enhance your drone safety. This guide is crafted to assist you in setting up and using your Dronetag Beacon efficiently. Whether you're a seasoned pilot or a beginner, we're dedicated to providing you with a reliable solution that prioritizes safety. Let's get started on safeguarding your flights with ease and confidence.
All instructions, warranties and other collateral documents are subject to change at the sole discretion of Dronetag s.r.o.
For up-to-date product literature, please visit https://help.dronetag.cz
The following terms are used throughout the product literature to indicate various levels of potential harm when operating this product:
WARNING: Procedures, which if not properly followed, create the probability of property damage, collateral damage, and serious injury OR create a high probability of superficial injury. |
CAUTION: Procedures, which if not properly followed, create the probability of physical property damage AND a possibility of serious injury. |
NOTICE: Procedures, which if not properly followed, create a possibility of physical property damage AND a little or no possibility of injury. |
WARNING: Read the ENTIRE instruction manual to become familiar with the features of the product before operating. Failure to operate the product correctly can result in damage to the product, personal property and cause serious injury. This is a sophisticated product. It must be operated with caution and common sense and requires some basic mechanical ability. Failure to operate this Product in a safe and responsible manner could result in injury or damage to the product or other property. This product is not intended for use by children without direct adult supervision. Do not attempt disassembly, use with incompatible components or augment product in any way without the approval of Dronetag s.r.o.. This manual contains instructions for safety, operation and maintenance. It is essential to read and follow all the instructions and warnings in the manual, prior to assembly, setup or use, in order to operate correctly and avoid damage or serious injury. |
Age Recommendation: Not for children under 14 years. This is not a toy. |
NOTICE: This product is only intended for use with unmanned, remote-controlled vehicles and aircraft. Dronetag s.r.o. disclaims all liability outside of the intended purpose and will not provide warranty service related thereto. |
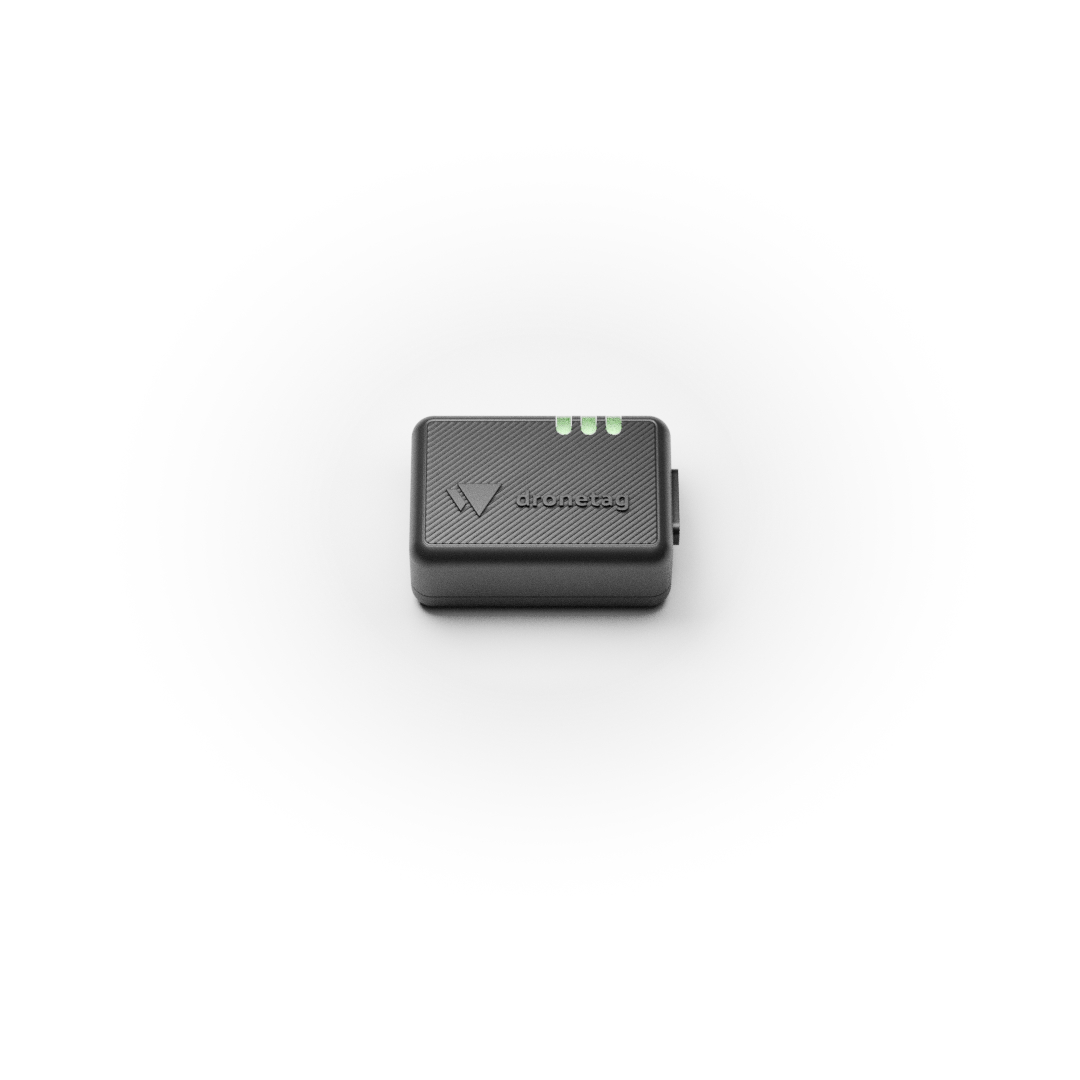
Dronetag Beacon is an effortless way to let your drone fly safe & compliant with the latest EU & US regulations mandating Direct / Broadcast Remote Identification. Dronetag Beacon is compatible with any kind of drone and works anywhere on the planet.
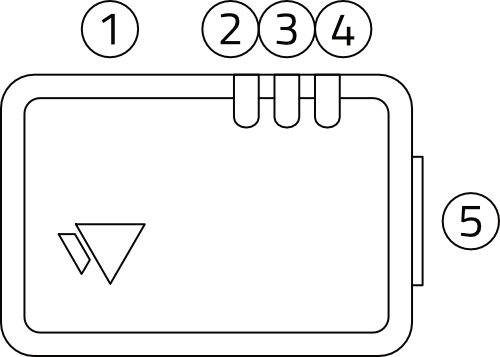
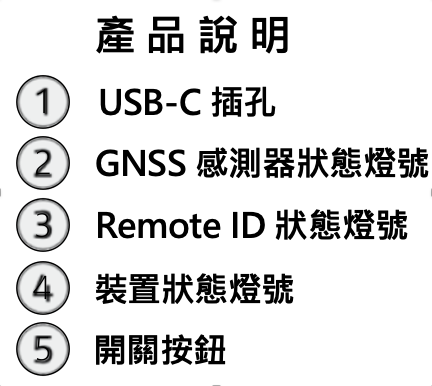
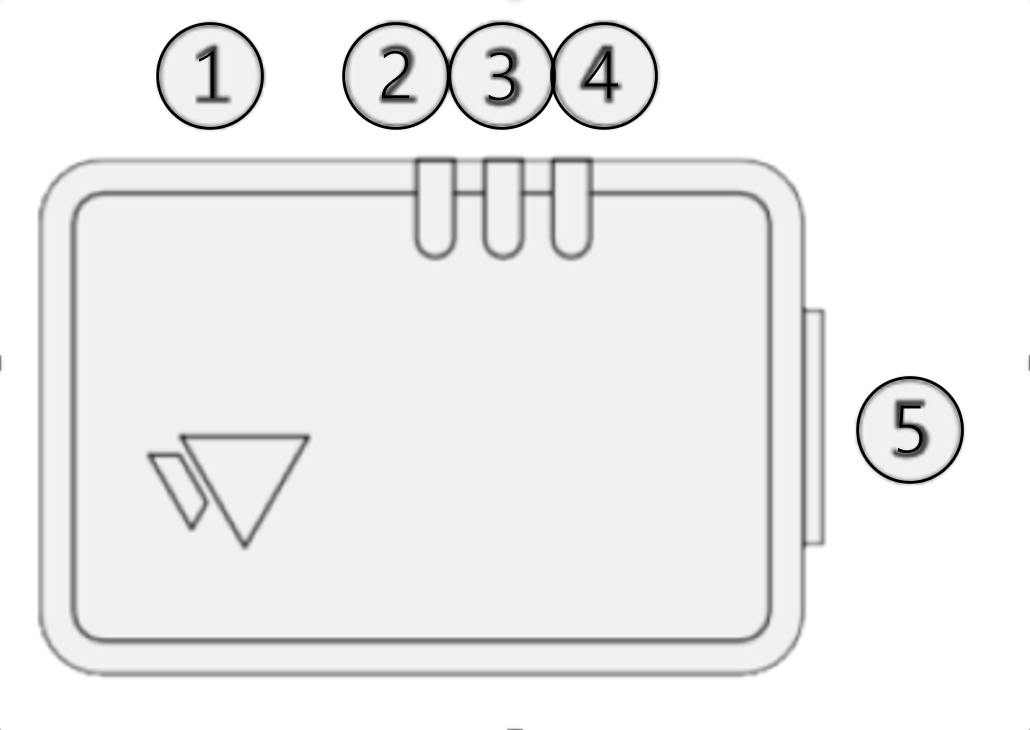
① USB-C
② Positioning LED
③ Remote ID LED
④ Device status LED
⑤ Button
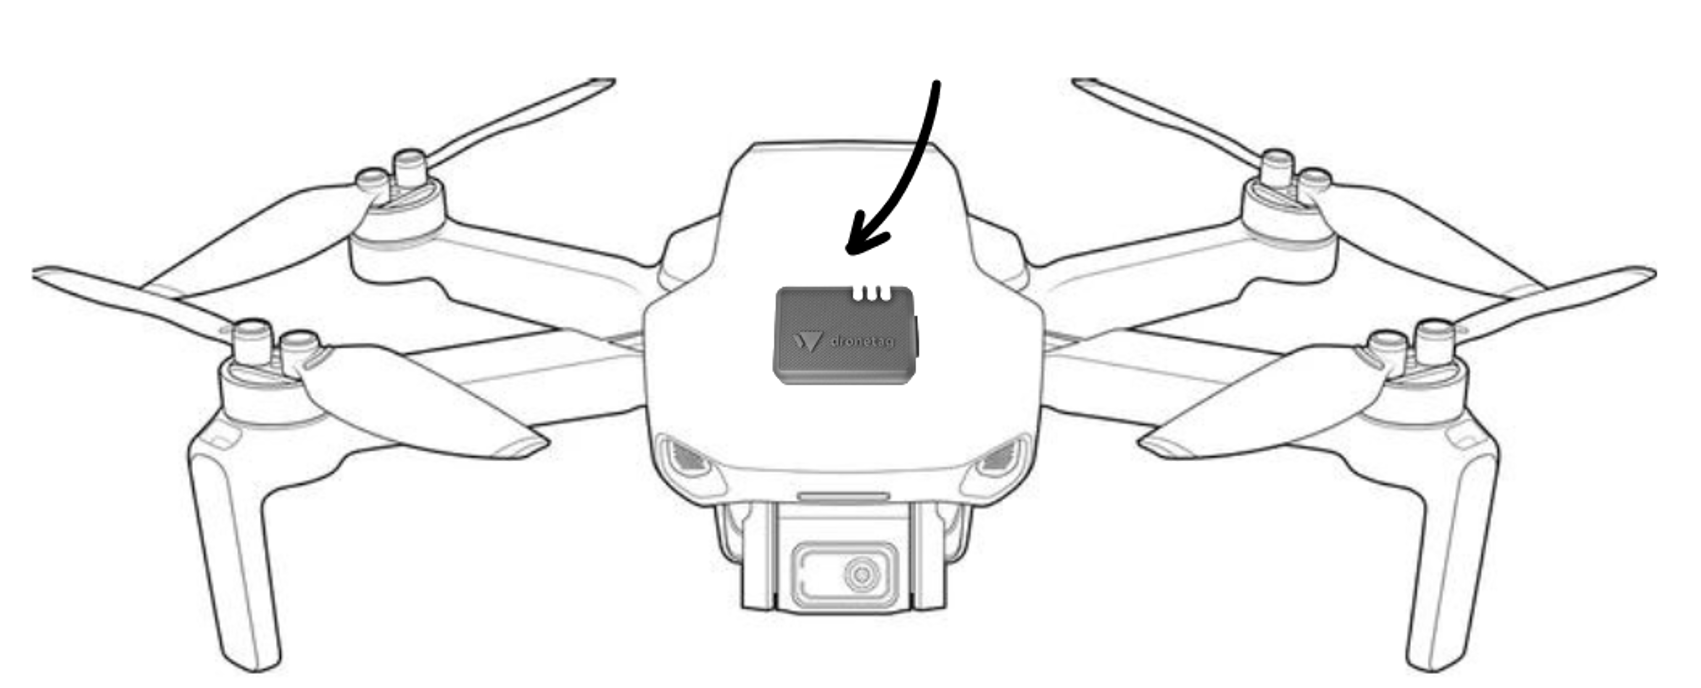
WARNING: When looking for a suitable location to place the Beacon on your drone, you need to watch out for the following potential issues:
|
NOTICE: Remember, if you put your Beacon on top of your drone, you can expect a better GNSS signal. When underneath, a better range for Bluetooth Remote ID. Therefore, the proper location might also depend on your use case. |
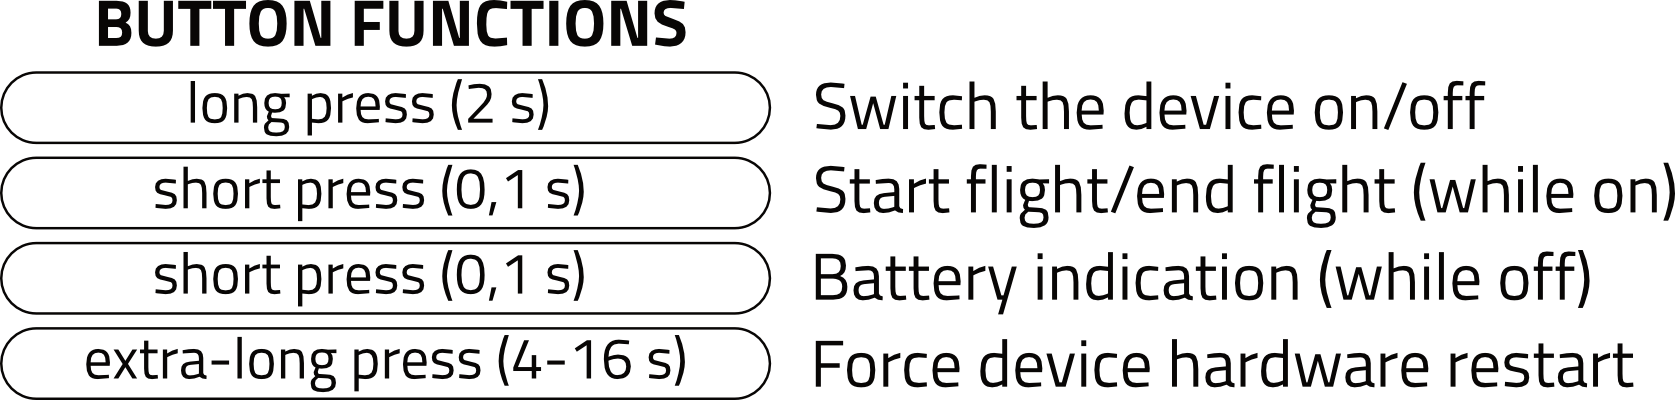
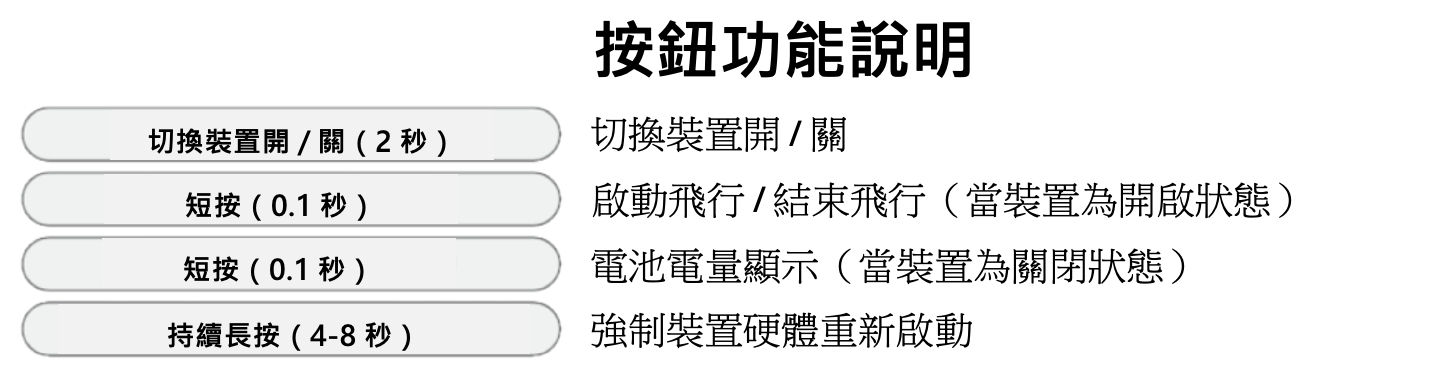
Dronetag Beacon is operated with the button located on the shorter side of the device.
For detailed LED status explanation please refer to:
https://help.dronetag.cz/dronetag-beacon-gen2/led-indications
NOTICE: The device usually works in all outdoor areas with GNSS signal. |
To quickly start your flight:
NOTICE: Dronetag Beacon requires a USB-C charger capable of delivering 5V. |
To charge your device:
Battery level is indicated by LED status:
NOTICE: When fully charged, LEDs turn off. |
Parameter | Value |
Short-range radio | Bluetooth 2.4 GHz |
Sensors | GNSS, barometer, accelerometer |
Positioning | GPS L1, GLONASS L1, Galileo E1, SBAS |
Built-in antennas | Bluetooth and GNSS |
Bluetooth output power | 8dbm |
External ports | Via USB-C |
Battery | Li-Po 3.7V 200 mAh |
Battery life | 10-18 hours (depending on the configuration) |
Charging | 5V USB-C |
Charging time | 2 hours from a discharged state |
Average current consumption | 15mA |
Maximum current consumption | 100mA |
Enclosure | plastic |
Fastening mechanism | 3M Dual-lock SJ4570 |
IP rating | IP43 |
Operating temperature | -20°C to +60°C (-4°F to 140°F) |
Dimensions | 37 x 26 x 16 mm (1.4 x 1.02 x 0.6 in) |
Weight | 17 grams (0.59 oz) |
For full troubleshooting steps please visit our help website:
Dronetag products are warranted to be defect-free in material and workmanship one year after the purchase. For the duration of the warranty period, Dronetag, at its sole option, will repair or replace any product which fails in normal use. Such repairs or replacement will be made at no charge to the customer for parts or labor, provided that the customer shall be responsible for any transportation cost.
NOTICE: Warranty does not apply to cosmetic damage, consumable parts, damage caused by accident, abuse, misuse, water, fire or flood, damage caused by unauthorized servicing, or product that has been modified or altered. |
Address:
Dronetag s.r.o.
Veltruská 602/16
Prague, 19000
Czech Republic
202403
版本 0.01
對所有說明書、保固條件和其他相關文件內容,Dronetag 公司保留完全自主決定修改的權利。所有最新的產品資料,請訪查以下網址https://help.dronetag.cz。
以下是在整份產品文件中可能出現的特殊名詞,用於解釋在使用產品時可能面臨的不同程度潛在風險:
警告:如果未按照正確的使用程序操作,可能導致財產損失、連帶損害和嚴重受傷,或很可能造成輕微受傷。
注意:如果未按照正確的使用程序操作,很可能導致實際財產損壞和嚴重受傷。
注意事項:如果未按照正確的使用程序操作,可能導致實際財產損壞,以及造成輕微或不會受傷。
警告:在使用本產品之前,請務必完整閱讀使用說明書,以熟悉產品的各項功能。未正確操作本產品可能導致產品損壞、個人財產損失和嚴重受傷。本產品設計複雜,必須小心操作,並具備一定的常識和基本的機械操作能力。未能安全和負責任地使用本產品可能導致受傷,或對產品或其他財產造成損害。本產品不適合未成年兒童在無成年人直接監督下自行操作使用。請勿恣意拆卸產品外殼、使用不相容的零附件或任何未經 Dronetag 公司測試驗證的增益組件。本使用說明書包含有關安全、操作和維護的說明。在組裝、設定或使用本產品之前,請務必仔細閱讀並遵循此使用說明書中的所有說明和警告,以正確操作並避免損壞或嚴重受傷。
年齡建議:不適合14歲以下兒童使用。本產品非玩具。
注意:本產品僅適用於無人、遙控載具和航空器使用。Dronetag 公司對使用目的以外的任何責任概不負責,並將不提供任何形式的相關保固服務。
Dronetag Beacon 提供了一種輕鬆的方式,讓您的無人機符合最新的歐盟和美國法規有關要求無人機配備 Direct / Broadcast Remote ID。Dronetag Beacon 可相容於任何構型的無人機,且可在全世界任何地方正常運作。
警告:在無人機上尋找適合放置 Beacon 的位置時,您必須注意以下潛在問題:
注意事項:請記住,將您的 Beacon 放置於無人機頂部時,您可以預期獲得更佳的 GNSS 信號。然而,若將其安裝於無人機底部,則可獲得更佳的藍牙射頻識別(Remote ID)範圍。因此,適當的安裝位置應根據您的使用情境而定。
Dronetag Beacon 的開關按鈕位於裝置較短的一側。
注意事項:有關 LED 燈號狀態的詳細說明,請參閱以下網站
https://help.dronetag.cz/dronetag-beacon-gen2/led-indications
一般使用
注意事項:此裝置通常在 GNSS 訊號良好的戶外場域運作。
注意事項: Dronetag Beacon 需要一個提供5V的USB-C充電器。
電池電量由 LED 燈號顯示:
注意事項:當充電電池充滿電時,LED 燈號將熄滅。
故障排除
有關於裝置故障排除的說明,請訪查我們的網站 https://help.dronetag.cz
參數 | 值 |
短距無線傳輸 | 藍牙 2.4 GHz |
內建感測器 | GNSS, 氣壓計, 加速度計 |
支援GNSS | GPS L1, GLONASS L1, Galileo E1, SBAS |
內建天線 | 藍牙與 GNSS |
藍牙輸出功率 | 8dbm |
外接連接阜 | USB-C |
充電電池 | Li-Po 3.7V 200 mAh |
電池續航力 | 10-18 hours (隨功能設定而有不同) |
充電阜規格 | 5V USB-C |
充電時間 | 從無電量到充飽電約2 小時 |
平均功耗 | 15mA |
最大電流消耗 | 100mA |
外殼材質 | 塑膠 |
固定機制 | 3M 強固型魔鬼氈 SJ4570 |
防水係數 | IP43 |
工作溫度 | 攝氏 -20° 到 +60° (華氏 -4° 到to 140°) |
大小尺寸 | 37 x 26 x 16 毫米(1.4 x 1.02 x 0.6 吋) |
重量 | 17 克 (0.59 盎司) |
在正常使用情況下,Dronetag 產品在購買一年內保證材料和工藝無瑕疵。在保固期內,Dronetag 將根據其單方面確認,決定修理或更換任何在正常使用中失效的產品。這些維修或更換將不收取客戶任何零件或人工費用,但客戶需自行負擔必須的運輸與處理費用。
注意事項:保固不適用於表面損傷、耗材部件、事故、濫用、誤用、水、火災或水災造成的損壞、未經授權的維修造成的損壞,以及已被修改或變更的產品。
地址:
Dronetag s.r.o.
Veltruská 602/16
Prague, 19000
Czech Republic