Integration of Dronetag DRI
It is important to note that integration and compliancy when using of Dronetag DRI will depend on the market you are in and the market where you plan to use the drone.
In the European Union (EU) market, there are slightly different regulations and compliance mechanisms in place for drones than in United States of America (USA). Before using DRI, it is important to familiarize yourself with these regulations and ensure that you comply with them.
US:
Please note that there are currently two variants of DRI integration for drones in US.
1. Basic integration for Drone pilots who want to use Dronetag DRI as a retrofitting device. This option of integration is mostly useful for hobby and custom-made drones. When doing this integration, you need to connect the Dronetag DRI to your flight controller and set up the Dronetag DRI device via our Dronetag App. That is all it takes. This option will make you compliant by the means of Remote ID Broadcast Module in US defined by FAA.
2. Full integration for Drone manufacturers who want to be compliant with the Remote ID rules to produce Standard Remote ID Drone in US defined by FAA. This Integration is complex and requires special configuration on the flight controller side and also ability to transfer the GNSS position from the ground station to the aircraft. We strongly recommend you to contact us and we will go over the points together.
EU:
The integration of Dronetag DRI allows you to comply with Remote ID requirement in C-class certified drones as defined by EASA.
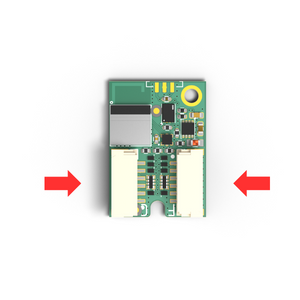
Tools and equipment needed
DRI module has several mounting options first are M2 screws preferably plastic ones. Drawing of mounting hole location is depicted here.
Other option is using double-sided tape or velcro. If you decide to use the velcro, we recommend you use 3M Dual Lock.
Before connecting the DRI, please check integration guide below and use the cable you have received with the DRI. When using custom cables please double check correct pinout on the cable.
Integration Steps
Dronetag DRI has two MAVlink capable UART ports with optional Flow control support. Port C is designed to be interfaced with a MAVlink flight controller.
Port F is designed to allow interfacing with additional MAVlink capable peripherals. Note that due to the development stage of the Dronetag DRI this port should be used for non-critical peripherals to prevent any disruption of the drone functionality. Even when it comes to the production lineup this is recommended to follow this advice due to possible need for drone recertifications, when placing the module in between critical peripherals and the flight controller.
- Flow control is currently not available in the firmware. Will be supported in future firmware releases.
When using Holybro SiK Telemetry Radio do NOT connect RTS (4) and CTS (5) signals between the Dronetag DRI and the Holybro telemetry radio.
Wiring Diagrams
Operating voltage: 3.5V - 17V
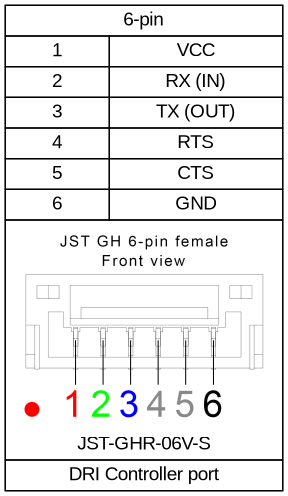
Flight controller port (Port C)
Default settings:
| |
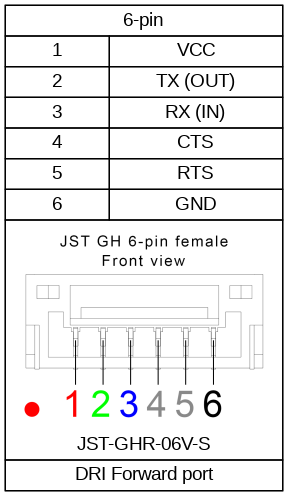
Forwarding port (Port F)
Default settings:
| |
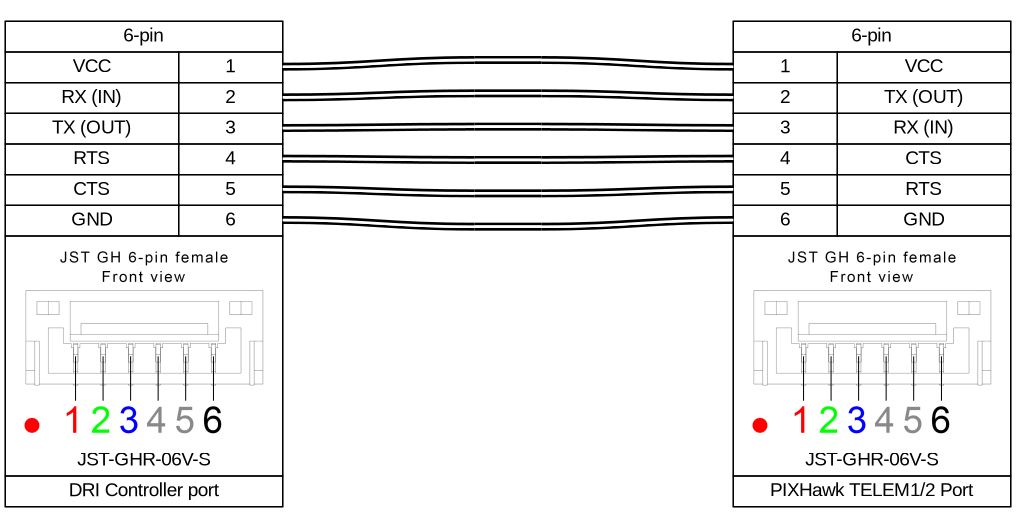
Pixhawk integration
Connect to PixHawk TELEM port according to wiring diagram below.
MAVlink Integration
MAVink integration on our devices works by setting the rate for messages below. The rate is defined by the specific configuration required by the user see the configuration. Messages are always checked for their type, source component id, and system id. These can be configured, by default they are set to 1 as most of the flight controller systems are using this configuration.
To support features requested by the FAA for Standard Remote ID Drone (eg. broadcasting of Operator position and Preventing drone takeoff without Remote ID solution), we provide the preexisting interface, which is available inside Ardupilot and QGroundControl utilizing MAVlink OpenDroneID. This interface allows the drone to take full control of the RID messages broadcasted by the device. The device broadcasts by default two Basic ID messages: first one containing the serial number of the Dronetag device and the second one for use by the Drone. The serial number of the Dronetag device is overridden when the drone supplies its own serial number using the Mavlink Basic ID message.
- In this mode, the Operator ID must be supplied by the drone instead of a standard way of configuration using Dronetag Mobile Application.
- MAVlink pack messages are unsupported the Dronetag device is handling the composition into the pack messages by itself.
OpendroneID configuration Ardupilot
DID_ENABLE=1
DID_MAVPORT=2 #Serial2
*Note: Currently Ardupilot needs to be compiled with OpenDroneID support.
Rate setting messages
MAVLINK_MSG_ID_ALTITUDE (PX4 - Pressure alternative)
MAVLINK_MSG_ID_SCALED_PRESSURE
MAVLINK_MSG_ID_GPS_RAW_INT
MAVLINK_MSG_ID_SYSTEM_TIME
MAVLINK_MSG_ID_GLOBAL_POSITION_INT
Other messages
MAVLINK_MSG_ID_HEARTBEAT
Additional messages required in the Standard Remote ID integration
Full description is here for the Opendroneid
These messages should be sent directly by the drone.
OPEN_DRONE_ID_BASIC_ID
OPEN_DRONE_ID_LOCATION
OPEN_DRONE_ID_SYSTEM
OPEN_DRONE_ID_OPERATOR_ID
OPEN_DRONE_ID_OPERATOR_ID message
Operator position should be dynamically sent from the GCS to the drone and the drone fills it into.
OPEN_DRONE_ID_ARM_STATUS
Drone should check this message for ARM ready state(DRI decoded all of the information correctly), It also contains an string with error message why it is not ready.
Forwarding
DRI module has a Forwarding port, which can forward MAVlink messages (MAVlink 2 only). This allows for connecting the DRI module on the drones lacking an additional TELEM port.
The baud-rate of this Forwarding port can be configured inside the Dronetag App. Any valid MAVLink message from the Forwarding port will be sent to the Controller port and vice versa. Note that this feature should be theoretically functional with any MAVlink peripheral, however problems may occur when using untested peripherals. Prior to using this feature, we highly recommend conducting thorough testing. Additionally, for non-flight critical component modules that may drop MAVlink messages when forwarding large amounts of data, we suggest forwarding them separately. In the majority of cases, the Forwarding port functions smoothly as a lossy connection. We recommend treating it as such, while acknowledging that occasional occurrences of dropped MAVlink messages may happen.
The DRI module changes rates on some messages on the flight controller that might interfere with peripheral functionality. When the peripheral will require some of the messages with rate other than the module see MAVlink integration section. In future updates, the module can operate with different rates than its own.