U.FL Antenna Installation
U.FL connectors are commonly used for antenna connections in space constrained product such as our Dronetag DRI and Dronetag BS. Due to their size, they are not designed with regular reconnection in mind, and they are only rated for a few dozens mating cycles (usually just 30). It is therefore crucial to select the proper antenna and ideally connect it once for a lifetime of the product. However, U.FL connectors are suitable for scenarios, where you need to do the antenna replacement (e.g. when it is no longer working properly or you upgrade to better antenna).
Before you try to connect or disconnect the U.FL antenans on our products, we recommend to study the U.FL tips from SparkFun and reading the instructions below.

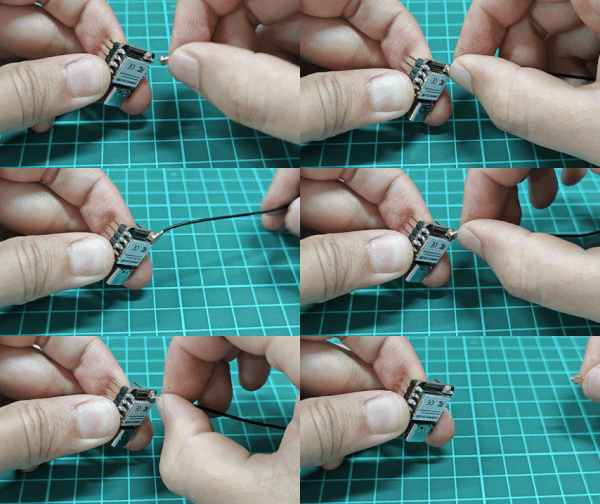
U.FL connector mating and unmating process (source Seeed Studio)
How to Connect U.FL
- Disconnect your device from any power supply and keep it turned off.
- Take the U.FL antenna and align it accurently over the U.FL female counterpart on PCB board.
- Press down gently until you hear satysfing click.
- Check whether you can rotate the antenna freely and if possible, protect the connector from external factors.
- If it takes too much force for the connection, you are probably missaligned.
How to Disonnect U.FL
Disconnecting the U.FL can be quite tricky as there is possibility of damaging the PCB board counterpart or antenna. Be careful during the process. You shouldn't need any tool for the removal and we strongly discourage of using screwdriver or similar that might damage the PCB board.
- Hold the cable with your nails as close to the connector as possible (ideally try to hold the metal stiffener built into the connector)
- Gently rotate and tilt the cable from the connector all the way up until it pulls away.
- Inspect the connectors on both sides and examine them for possible damage.
- For the removal process, you shouldn't really need much force to do it.