C‑class for Manufacturers in the EU
Integrating the Dronetag DRI module directly into a drone during manufacturing ensures that the aircraft can be certified as a C‑class UAS under EU Regulation 2019/945. This integration makes Remote ID a built‑in feature of the drone, not just an add‑on, and guarantees that the aircraft will always broadcast its identification data as required.
In practice, this means connecting the DRI module to the flight controller, ensuring continuous GNSS‑based position reporting, and verifying that the drone cannot take off if Remote ID is not functional. The details of wiring, firmware compatibility, and serial number handling are described in the following sections.
If you need any help certifying our device, please contact us at support@dronetag.com.
Certification in the EU
The integration of the Dronetag DRI module is only one part of the compliance process. In parallel with the integration steps described in this guide, manufacturers must complete the C‑class certification process under Regulation (EU) 2019/945. This process ensures that the drone can be legally placed on the EU market with a class identification label (C0–C6).
The certification process consists of the following main steps:
Technical Documentation
Prepare full technical documentation covering both design and production. This documentation must include at least:
- General description of the UAS (design, intended use, limitations)
- Detailed design drawings, schematics, and bill of materials
- Test reports (functional, safety, EMC, noise, Remote ID performance)
- Risk analysis and mitigation measures
- Production quality control procedures
- Copies of instructions and user manuals supplied with the product
The documentation must be sufficient to demonstrate compliance with all applicable essential requirements of Regulation (EU) 2019/945.
Conformity Assessment
Select and complete the appropriate conformity assessment procedure depending on the drone class and your production setup:
-
Module A (Internal production control) – available only for C0 class drones. As a manufacturer, you can self‑declare conformity without involving a Notified Body, provided you prepare full technical documentation and carry out your own internal testing to prove compliance.
-
Module B (EU‑type examination) – the Notified Body tests and certifies that your drone’s design meets all essential requirements. For you, this means submitting a representative sample and documentation for independent evaluation.
-
Module C (Conformity to type) – this follows Module B. As a manufacturer, you must ensure that every unit you produce matches the approved type and keep records to demonstrate this consistency.
-
Module H (Full quality assurance) – the Notified Body audits your entire quality management system. If you choose this route, you need to maintain a robust quality system covering both design and production, which will be regularly reviewed.
For drones in classes C1, C2, C3 (and higher), Module A is not available. In these cases, cooperation with a Notified Body is mandatory. A Notified Body is an independent certification organization designated by an EU Member State and listed in the NANDO database.
EU Declaration of Conformity
After successful conformity assessment, the manufacturer must issue an EU Declaration of Conformity. This document states that the product complies with Regulation (EU) 2019/945 and the relevant harmonized standards (e.g. EN 4709‑002 for Remote ID). The Declaration must be signed by the manufacturer’s authorized representative and kept available for market surveillance authorities.
CE Marking and C‑class Label
Once conformity is confirmed, affix the CE marking and the correct C‑class identification label (C0–C6) to the aircraft. These markings must be visible, legible, and indelible. Without CE marking and C‑class labeling, the drone cannot be legally placed on the EU market.
Production Serials and Traceability
Each manufactured unit must carry a unique Remote ID serial number in the ICAO‑compliant ANSI/CTA‑2063‑A format. Manufacturers must maintain detailed records of:
- Production batches
- Assigned serial numbers
- Firmware configurations
These records must be preserved for conformity assessment and for potential audits by market surveillance authorities.
Integration Architecture
The integration relies on a data flow between the Ground Control Station (GCS), the flight controller, and the Dronetag DRI module:
- The GCS software (e.g., QGroundControl, Mission Planner) provides operator information and status messages using the OpenDroneID MAVLink message set.
- The flight controller relays these messages to the DRI module, adding live telemetry such as GNSS position and system status.
- The DRI module broadcasts the combined Remote ID data over BLE/Wi‑Fi in compliance with EU harmonized standards.
- If the GCS link is lost, the flight controller continues to provide the last valid data to the DRI, ensuring uninterrupted broadcast.
This architecture ensures that Remote ID is always active and that the drone cannot take off if the DRI or GNSS is not functional.
Key Integration Requirements
Firmware Compatibility
To integrate the Dronetag DRI module, the flight controller must run firmware that supports the OpenDroneID message set. How to create the required firmware for basic purposes with OpenDroneID support is described later in this Guide.
The firmware must be built in a tamper‑resistant way and reliably publish the required Remote ID messages. End users must not be able to disable or alter this functionality.
MAVLink messages
When integrated with an autopilot supporting OpenDroneID (ArduPilot, PX4), the Dronetag DRI exchanges MAVLink messages. The autopilot provides flight data, and DRI acts as the broadcast interface. All required messages and their meanings are listed below, with the most important ones described in dedicated sections.
Messages required from the autopilot
- MAVLINK_MSG_ID_ALTITUDE – altitude (PX4: pressure altitude).
- MAVLINK_MSG_ID_SCALED_PRESSURE – barometric pressure data.
- MAVLINK_MSG_ID_GPS_RAW_INT – GNSS position.
- MAVLINK_MSG_ID_SYSTEM_TIME – system time reference.
- MAVLINK_MSG_ID_GLOBAL_POSITION_INT – global position.
- MAVLINK_MSG_ID_HEARTBEAT – system status.
Additional messages from OpenDroneID set
- OPEN_DRONE_ID_BASIC_ID – drone identification (overrides DRI default ID).
- OPEN_DRONE_ID_LOCATION – drone position.
- OPEN_DRONE_ID_SYSTEM – system information.
- OPEN_DRONE_ID_OPERATOR_ID – operator identification (must come from autopilot, not DRI app).
- OPEN_DRONE_ID_ARM_STATUS – confirms DRI decoded all data correctly and drone is ready to arm (includes error messages if not).
Serial Number Handling (OPEN_DRONE_ID_BASIC_ID)
The drone must transmit its own UAS serial number in the ICAO‑compliant ANSI/CTA‑2063‑A format. This value overrides the default DRI serial number.
We strongly recommend hardcoding the serial number into the flight controller firmware (protected parameter or EEPROM), not relying on GCS runtime configuration. This ensures the value is stored in a tamper‑free location and cannot be modified by the end user.
If you use a pre‑prepared integration method (for example, ArduPilot builds with OpenDroneID support), you must verify that the firmware truly stores the serial number in a protected, tamper‑free memory area and that it cannot be changed by the operator after production.
Arming and Failsafe (OPEN_DRONE_ID_ARM_STATUS)
The drone must refuse takeoff if the DRI module is disconnected, misconfigured, or if no valid GNSS fix is available. This requirement comes directly from the harmonized standard EN 4709‑002, which supports compliance with EU Regulation 2019/945 for C‑class drones.
The purpose of this requirement is to ensure that Remote ID is always active before and during flight. Manufacturers must implement a pre‑flight check that blocks arming if Remote ID or GNSS is not functional, and verify this behavior during conformity assessment testing.
GNSS Lock and Continuity
A valid GNSS fix must be established before arming the drone. The system must maintain continuous GNSS position reporting throughout the entire flight.
This requirement ensures that the Remote ID broadcast always contains accurate and up‑to‑date location data, as mandated by EN 4709‑002 under EU Regulation 2019/945.
If GNSS reception is lost, the drone must trigger the defined failsafe behavior — for example, blocking arming while on the ground, or executing Return‑to‑Home (RTH) or controlled landing during flight. Manufacturers must verify this behavior during conformity assessment testing.
Broadcast Continuity
The Remote ID broadcast must remain uninterrupted throughout the entire flight. If the Ground Control Station (GCS) stops providing updates, the flight controller must continue sending the last valid data to the DRI module.
This requirement ensures that the Remote ID signal is always active and compliant with EN 4709‑002 under EU Regulation 2019/945. Manufacturers must verify during conformity assessment that the broadcast does not stop even in case of GCS link loss or temporary communication issues.
Antenna Placement and EMC
The DRI module and its antenna must be installed in a way that guarantees reliable signal transmission. They must not be shielded by conductive materials such as carbon fiber or metal parts of the airframe.
The antenna should be firmly secured to prevent detuning, cable strain, or damage during flight. Manufacturers must verify electromagnetic compatibility (EMC) as part of the conformity assessment, ensuring that the Remote ID broadcast is not degraded by other onboard electronics.
Production Serials and Traceability
Each manufactured unit must carry a unique Remote ID serial number.
This identifier must follow the ICAO‑compliant ANSI/CTA‑2063‑A format and be permanently assigned to the aircraft during production.
Manufacturers are responsible for maintaining detailed records of production batches, assigned serial numbers, and firmware configurations.
These records must be preserved for conformity assessment and potential market surveillance by authorities.
It is the manufacturer’s duty to verify that:
- every unit leaving production has a valid and unique Remote ID serial number,
- the serial number is correctly stored in tamper‑free memory,
- and the production documentation is complete and auditable.
If you are building or modifying your own flight controller firmware, please see the Custom Firmware Integration Guide.
It explains which MAVLink and OpenDroneID messages must be published to the Dronetag DRI, which identifiers must be hardcoded in firmware (such as Remote ID serial numbers), and which values should remain configurable (such as Operator ID in the EU or operator location in the USA).
This guide also points to a reference implementation on GitHub and describes how to verify correct broadcasts using the DroneScanner app.
Step-by-Step Integration Guide
You will need:
- Flight controller (e.g. Pixhawk or ArduPilot) programmed with unique firmware created in section Unique firmware for Flight Controller
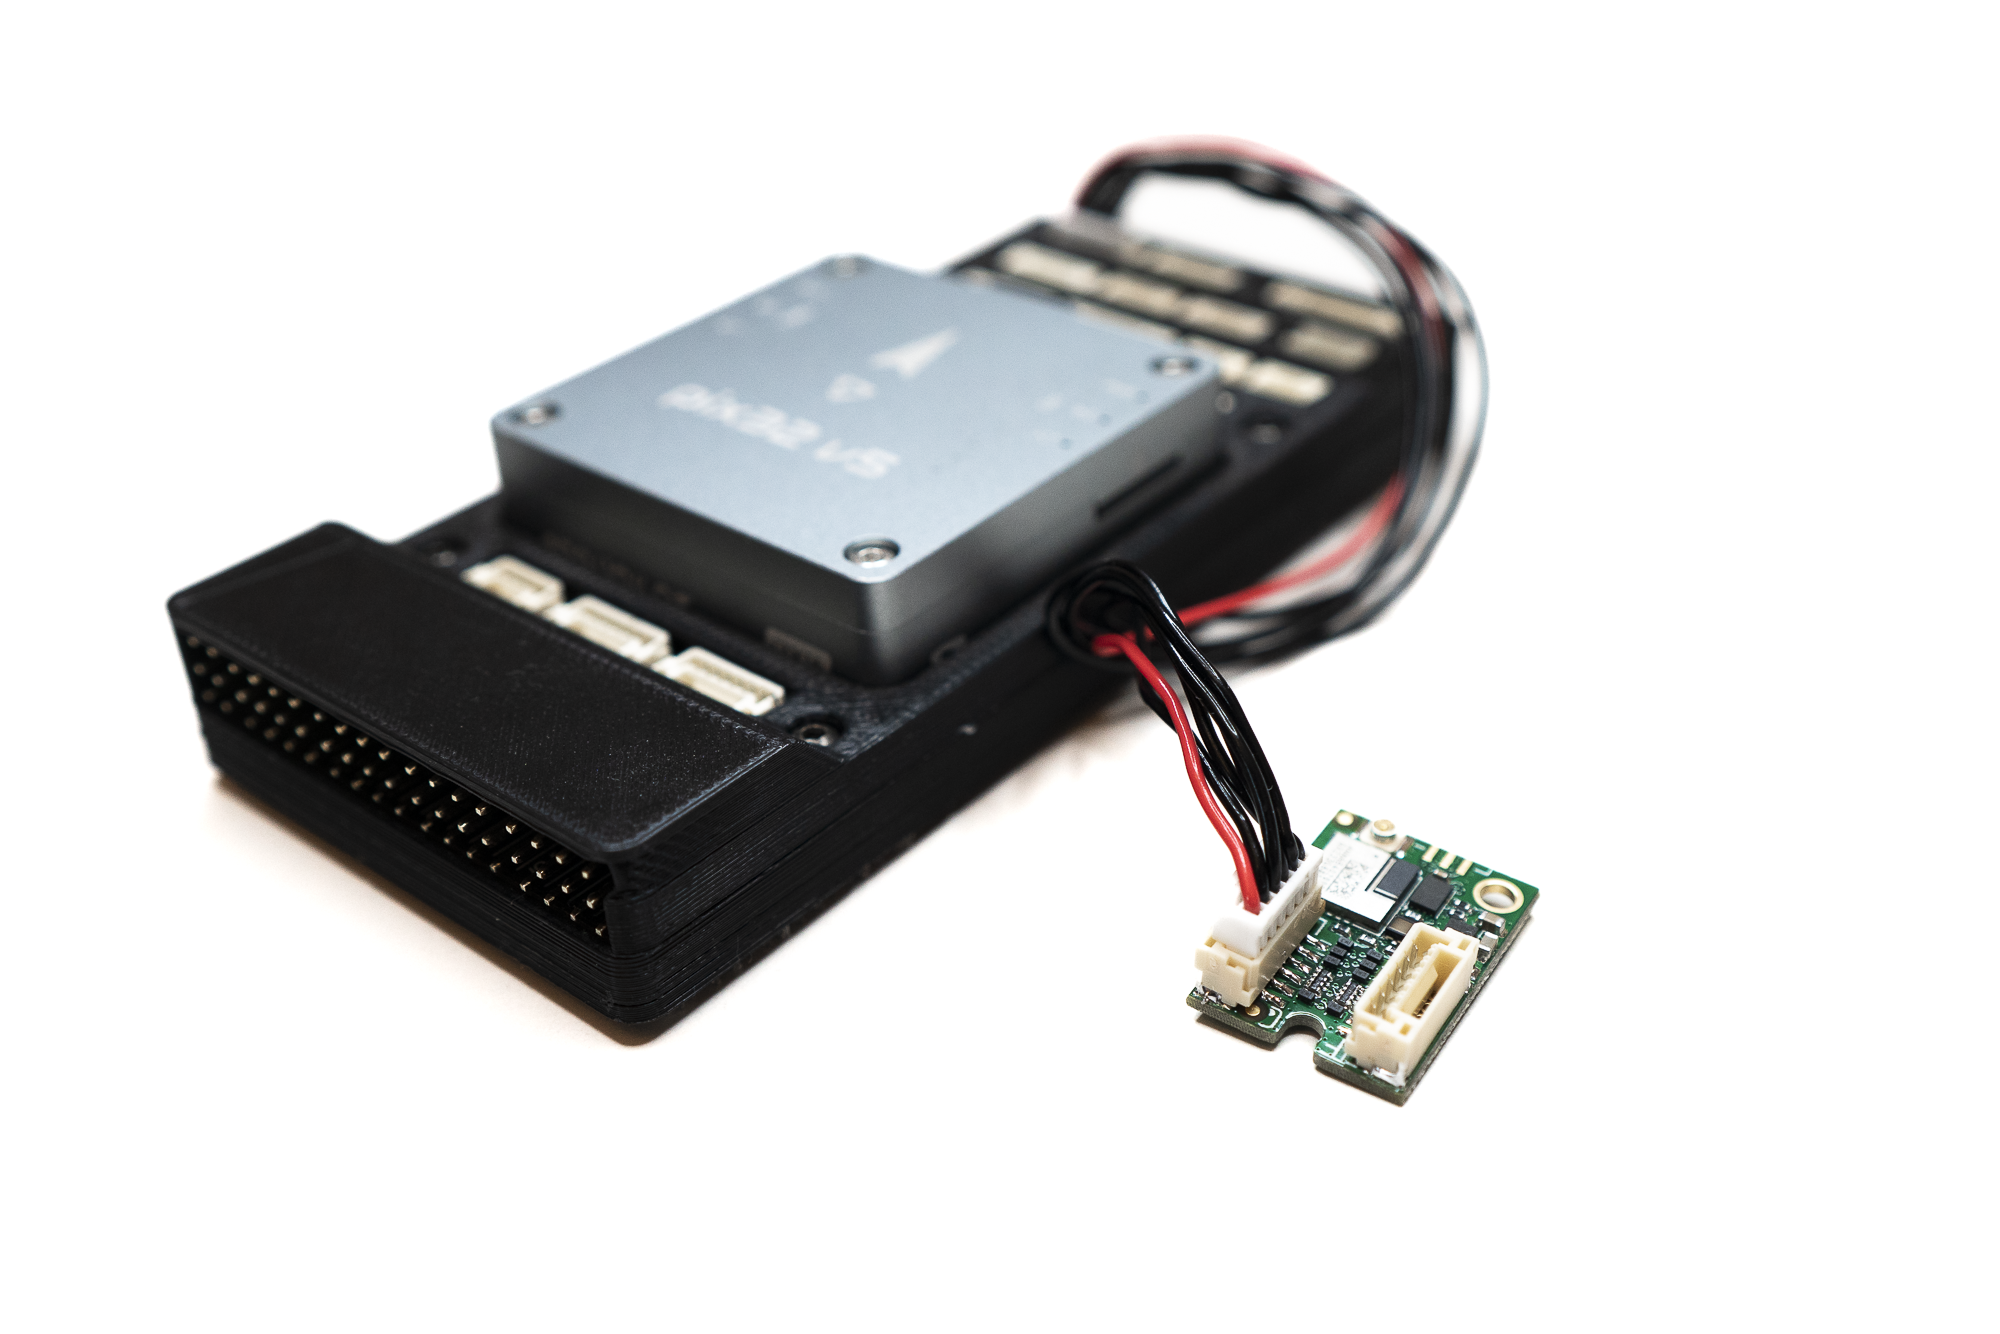
- Dronetag DRI module (recommended: U.FL antenna variant)
- Compatible antenna for the U.FL variant. The small testing antenna is included with a Dronetag DRI.
We recommend choosing a pre-approved antenna from our approved list of antennas. - Compatible cable to connect the DRI module to your flight controller. The example cable is included with a Dronetag DRI.
- Tools to securely mount the DRI module to your drone: 3M Dual Lock / strong adhesive tape / Velcro or M2 screw.
- Smartphone supporting BLE 5.0 (for broadcast verification).
Unique firmware for Flight Controller
To integrate the Dronetag DRI module with your flight controller, you’ll need to build a unique firmware tailored to your hardware and compliance needs. The process depends on whether you're using ArduPilot or Pixhawk/PX4 firmware.
Pixhawk / PX4 Firmware
Pixhawk flight controllers running PX4 firmware currently offer experimental support for Remote ID only. However, full Open Drone ID integration is not yet supported at the time of writing. For details on current capabilities and supported hardware, refer to the PX4 Remote ID documentation.
We recommend checking this page regularly, as PX4 development is active and support for full Open Drone ID integration may be added in future releases.
Ardupilot firmware
If your flight controller runs ArduPilot, follow the official ArduPilot guide for OpenDroneID firmware creation. This guide includes instructions for:
- Enabling tamper-resistant features
- Compiling firmware with specific board IDs
- Configuring MAVProxy for testing
Before proceeding, integrators should verify—based on the documentation of their flight controller manufacturer and the firmware used—whether the firmware publishes the required Remote ID messages listed earlier in the section Key Integration Requirements.
Mount the DRI on the Drone
- Look at your drone and find a suitable place for secure installation of the DRI module:
- DRI module with integrated antenna should be placed away from conductive materials like metal or carbon fiber.
- DRI module with U.FL antenna can be mounted on any material, but the antenna should not be covered with any conductive material like metal or carbon fiber.
- With a DRI module with U.FL antenna: position and secure the antenna in a place where it can freely transmit and receive signals.
- Use screws or adhesive tape to secure the DRI module to your drone.
- The DRI module should be mounted firmly and securely so it will not move during future flights.
- Look at your drone and find a suitable place for secure installation of the DRI module:
Connect DRI to Flight Controller
- Using the included cable or your custom cable, connect the DRI module and the flight controller:
- On the DRI module, choose Flight Controller port (Port C)
- On the flight controller, choose any unused telemetry port or serial interface port
- Please note the number of the telemetry/serial port to which you connected the DRI. It will be needed later.
noteFrom now on, we will demonstrate the guide steps on a Holybro Pix32 v5 flight controller as a reference.
The guide steps are identical or very similar for any other compatible flight controller.warningFollow the manufacturer's documentation for your flight controller to decide where you should connect your DRI module.
- Using the included cable or your custom cable, connect the DRI module and the flight controller:
Power On and Check LED Indicators
-
Power on the drone and check the DRI status:
- Yellow LED → Indicates basic power-up and standby. This is the expected state for a brand-new Dronetag DRI.
- Green LED → DRI is ready for takeoff. This means the DRI is already configured, and you should verify that the rest of the configuration is correct.
- If the LED occasionally flashes red, you may continue with the configuration. This can indicate a temporary mismatch between the configuration of the flight controller and the DRI, which will be resolved in the following steps.
-
See the LED indicator reference for the full color guide.
noteFor correct interpretation of the LED status, always check the indicator from a direct viewing angle.
When viewed from the side, the internal construction of the RGB LED may partially obscure one of its elements, which can make the color appear different.-
Configure DRI via Mobile App
If you are doing this for the first time, see the detailed walkthrough: DRI Configuration
- Use one of the supported mobile apps:
- Open the Dronetag Toolbox app.
- Select your DRI device from the device list.
- On the Identification screen, configure the EU profile and confirm that the aircraft’s UAS serial number (ANSI/CTA‑2063‑A) is used as the Basic ID.
- On the Configuration screen, check the following settings:
- Enable MAVLink flight start – True
- GNSS Input – MAVLink
- Pressure data input – MAVLink
- MAVLink Integration Type – OpenDroneId
- Controller Port Baud Rate – 115200
Connect the Flight Controller to PC
If you are doing this for the first time, see the detailed walkthrough: Connect to Flight Controller
A USB connection is the fastest and most reliable method to configure the flight controller. The alternative is to use a SiK Telemetry connection, which is slower than USB connection, so be patient.
SiK TelemetryConnection using a SiK telemetry radio does not require a physical connection between the flight controller and PC, but it is much slower to work with than the USB method. How to use the Holybro SiK radio is described on the page Holybro SiK Radio V3 documentation.
SiK Telemetry warningIf you decide to connect a SiK Telemetry through the Port-Forwarding feature of the DRI, do not connect RTS/CTS lines between the DRI and the SiK radio.
Configure the Flight Controller
If you are doing this for the first time, see the detailed walkthrough: Flight Controller Setup
- Assign the correct serial port for the DRI in the FC parameters (symbol x in parameter names below). Use the noted number of the telemetry/serial port from the previous step:
SERIALx_PROTOCOL = MAVLink
- Set the serial port baud rate to 115200:
SERIALx_BAUD = 115200
- Turn off serial port flow control:
BRDSERx_RTSCTS = 0
- Enable OpenDroneID support:
DID_ENABLE = Enabled
- Set the port to which the DRI is connected:
DID_MAVPORT = x
infoTo set up your flight controller to support OpenDroneID, the flight controller must run unique firmware. See the section Unique firmware for Flight Controller.
- Assign the correct serial port for the DRI in the FC parameters (symbol x in parameter names below). Use the noted number of the telemetry/serial port from the previous step:
Configure the Ground Control Station
- Open your ground control station app that supports OpenDroneID.
- Configure the OpenDroneID support in the ground station app for EU operation:
- Region of Operation – EU
- No need to transmit operator GNSS location
infoTo use the OpenDroneID support of your ground station app, your flight controller must also support OpenDroneID. See the section Unique firmware for Flight Controller.
Confirm LED Status After FC Configuration
- Check the DRI status:
- Green LED → DRI is receiving valid MAVLink data and is ready for takeoff
- **Yellow LED ** - Please check if your drone has GNSS lock.
- Red LED → Please check the cable connection between DRI and flight controller and ensure it is properly plugged in.
- See the LED indicator reference for the full color guide
noteFor correct interpretation of the LED status, always check the indicator from a direct viewing angle.
When viewed from the side, the internal construction of the RGB LED may partially obscure one of its elements, which can make the color appear different.- Check the DRI status:
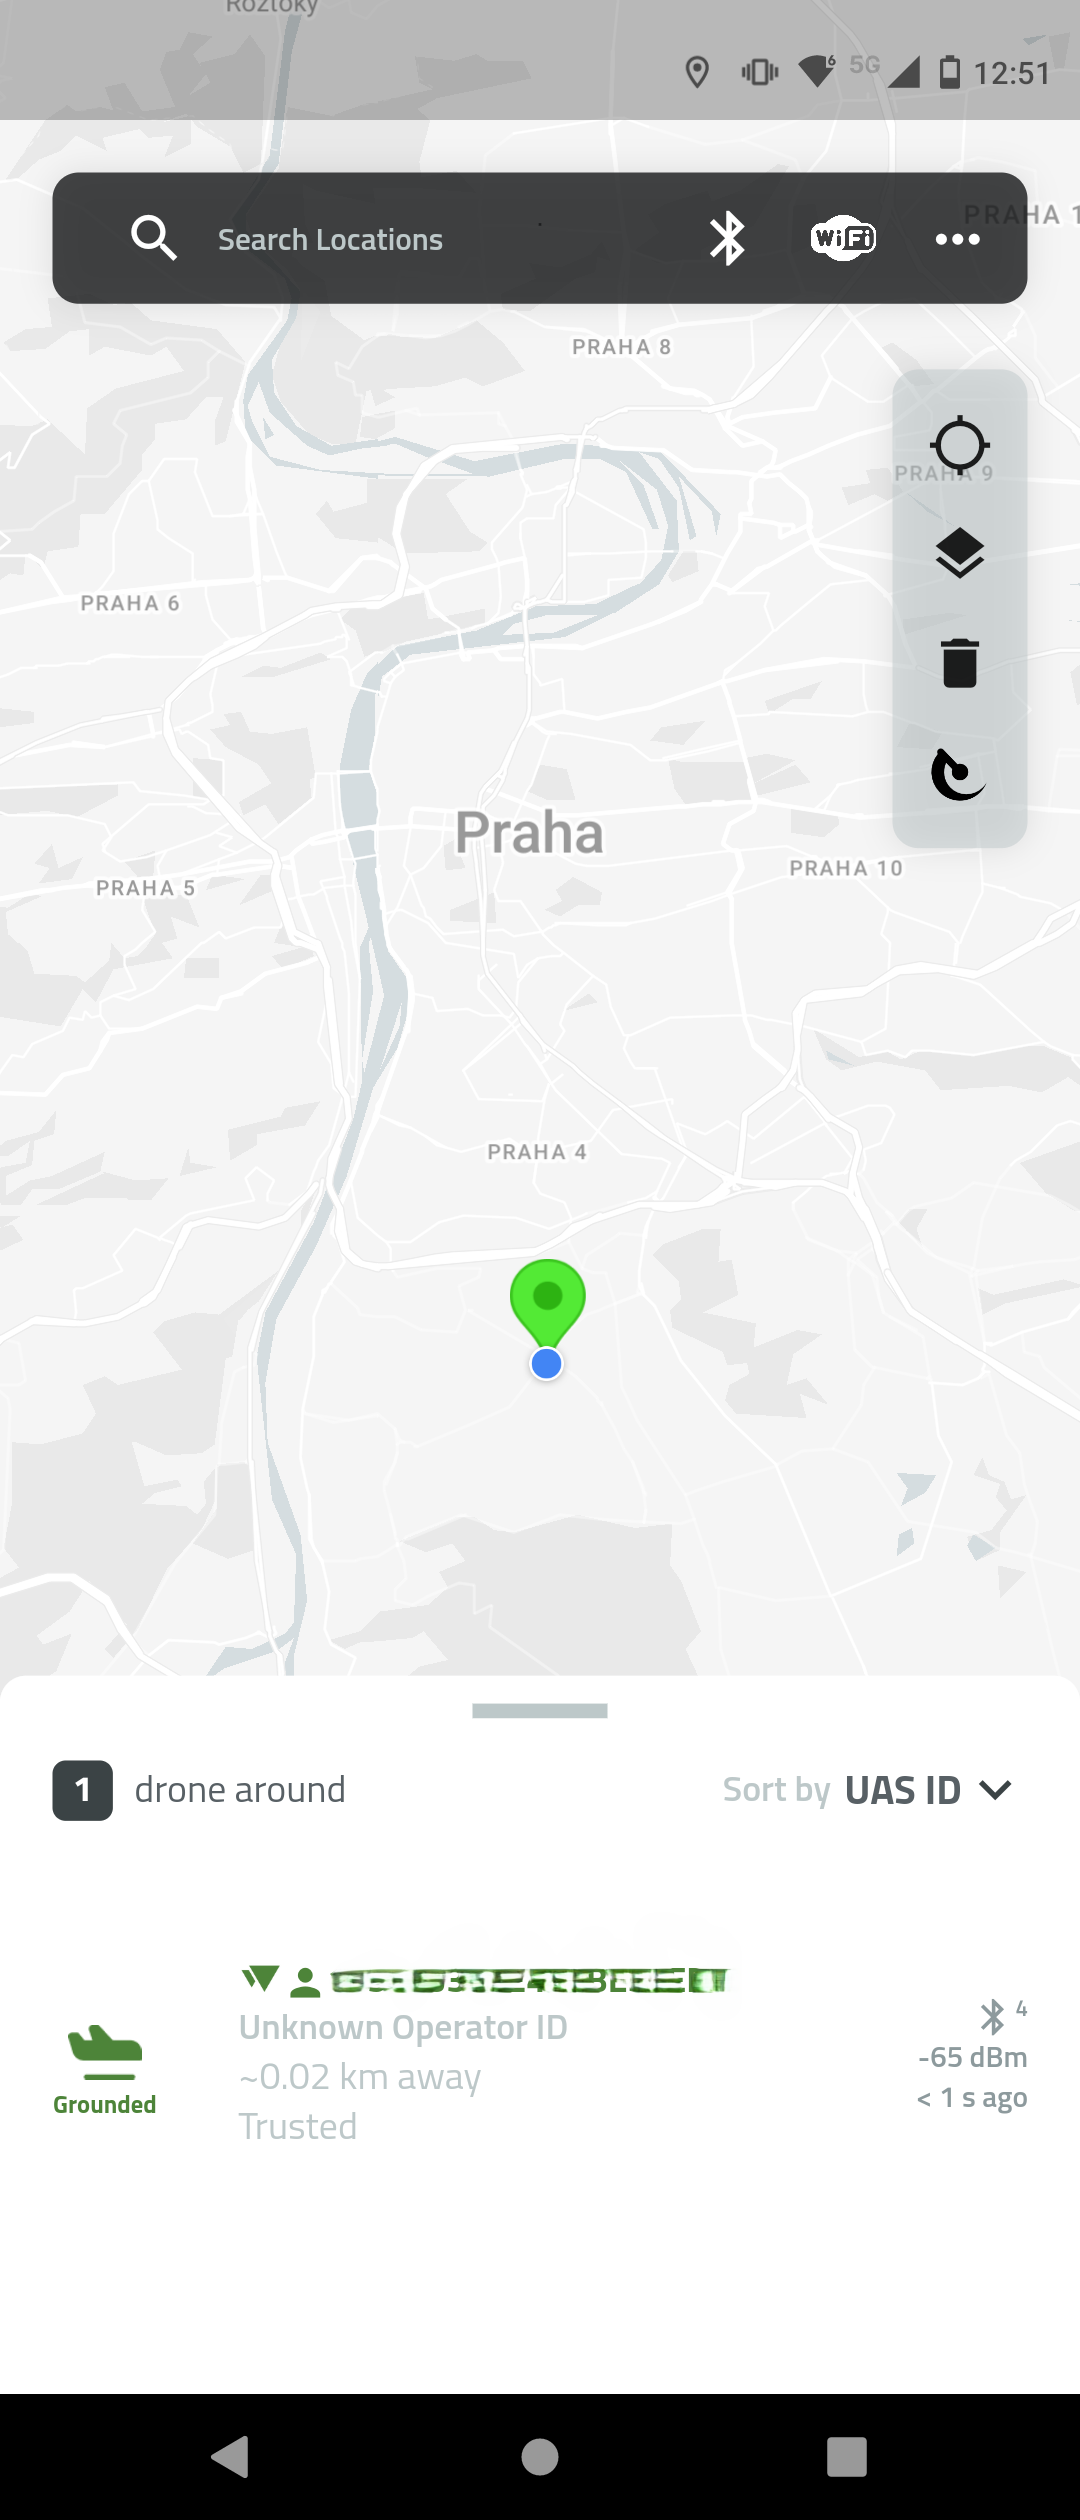
Verify Broadcast in Mobile App
-
Use the Dronetag DroneScanner app on a BLE 5.0-capable device:
-
Confirm the transmission of Remote ID data:
- Serial number
- Drone location
- Timestamp
- Operator info (if applicable)
-
Done
At this point your drone design meets the technical requirements of Remote ID integration. To complete compliance as a manufacturer under EU Regulation 2019/945, you must finalize the C‑class certification process:
Technical Documentation
Prepare full technical documentation covering design, testing, and analysis of the drone and its integrated Remote ID system. This documentation must be sufficient to demonstrate compliance with all applicable essential requirements.
Conformity Assessment
Select and complete the appropriate conformity assessment procedure (Module A, B+C, or H) depending on your production setup and category of the drone.
Important: For drones in classes C1, C2, C3 (and higher), Module A (self-declaration) is not available. In these cases, the manufacturer must cooperate with a Notified Body:
- Module B (EU-type examination): the Notified Body tests and certifies that the drone design meets all essential requirements.
- Module C (conformity to type): the manufacturer ensures that every produced unit conforms to the approved type.
- Module H (full quality assurance): the Notified Body audits the manufacturer’s quality system covering design and production.
This independent assessment is required by Regulation (EU) 2019/945 to guarantee compliance with safety, Remote ID, geo-awareness, and other mandatory features. Only after successful assessment with a Notified Body can the manufacturer issue the EU Declaration of Conformity and affix the CE marking with the correct C‑class label.
EU Declaration of Conformity
Issue an EU Declaration of Conformity stating that the product complies with Regulation (EU) 2019/945 and the relevant harmonized standards (including EN 4709‑002 for Remote ID). The full list of harmonized standards is published by the European Commission and can be found here: Official list of harmonized standards for drones – European Commission
CE Marking and C‑class Label
Affix the CE marking and the correct C‑class identification label (C0–C6) to the aircraft. These markings must be visible, legible, and indelible.
Production Serials and Traceability
Ensure that each manufactured unit carries a unique Remote ID serial number. Maintain detailed records of production batches, assigned serials, and firmware configurations for market surveillance and audits.
Until CE marking and C‑class labeling are completed, the drone is not legally a C‑class UAS and cannot be placed on the EU market.
For detailed guidance, see EASA – Placing a drone on the market with class identification label.
If you need any help certifying our device, please contact us at support@dronetag.com.