Sensor+ configuration
Sensor+ offers advanced integrations with third-party servers.
- TAK
- Sapient
- FlytBase
- SafeSky
- BEAST
- ADSBExchange
- OGN
- DJI O4 Ground Station
- Skydio
TAK (Tactical Awareness Kit)

TAK offers unsecured and secured communication. Secured communication uses certificates that come in three possible ways to the Scout client
- as separate PEM files (one for CA - the server certificate, one for client certificate, and one for client's private key);
- as P12 bundle - this file contains all three mentioned PEM files bundled together;
- from enrollment process (will be described later)
If your Scout runs in Cloud Mode, you don't need this integration to get drone tracks into TAK - the Dronetag cloud can stream them to your TAK server for you over the integration portal. Use that route whenever you don't need the direct data flow from the Scout itself; the Sensor+ integration described here is what you want when the Scout must reach the TAK server on its own, without any cloud in the path. See Using Scout with the Dronetag App for a video walkthrough of the cloud route.
Basic settings
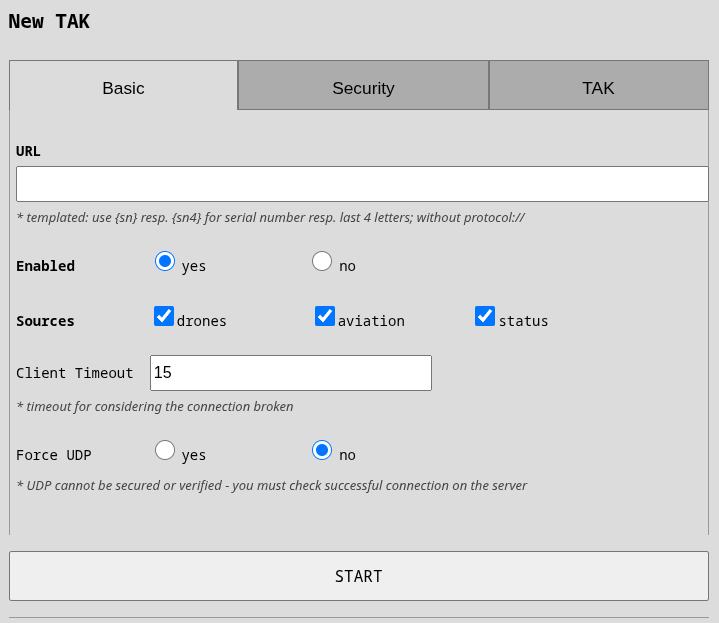
URL: specify host (e.g. tak.example.com) or ip (e.g. 10.1.1.25). If your server uses standard ports (8088 unsecured, 8089 secured) then you don't need to specify the port. If you want to use unsecured UDP version, use "Force UDP" switch.
SOURCES: you should keep drones and status messages. The only meaningful change is (un)checking aviation if
you don't want to see surrounding airplanes in your TAK.
Force UDP: if your server supports only UDP protocol then check this option. UDP cannot be secured nor verified ( connection failure will never be reported).
Security settings
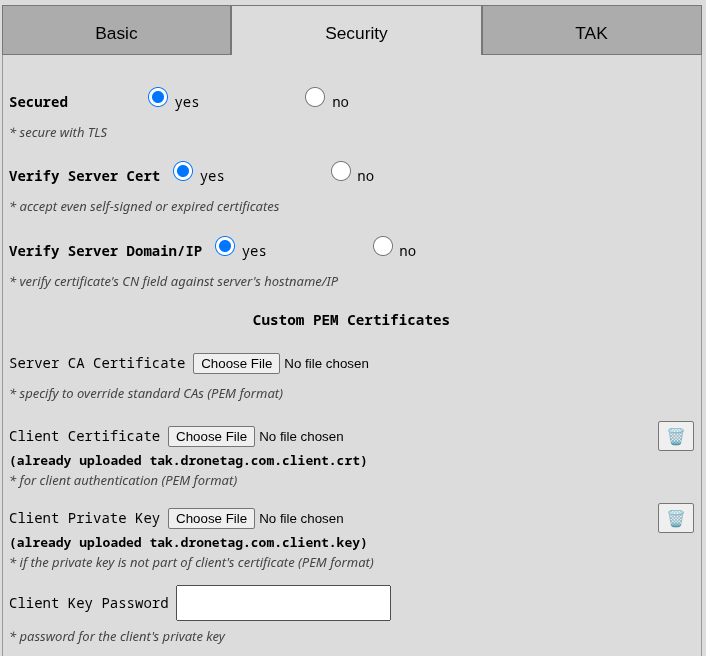
The suggested setup is to have all security features enabled (security, verify server cert, verify server domain). This will ensure server certificate is enforced and thoroughly checked. If the server certificate doesn't have its domain/IP correctly filled in, then you can disable the domain/IP check to accept even such certificate and keep your comms secured. In this case, either your server needs to use globally recognized CA such as Let's Encrypt or you need to supply your CA's certificate into the first field "Server CA Certificate" in PEM format. There is the option to use p12 bundle with "P12 Trust Bundled RootCA" that will take CA certificate from the last certificate from the bundle.
CERTIFICATE VERIFY FAILED
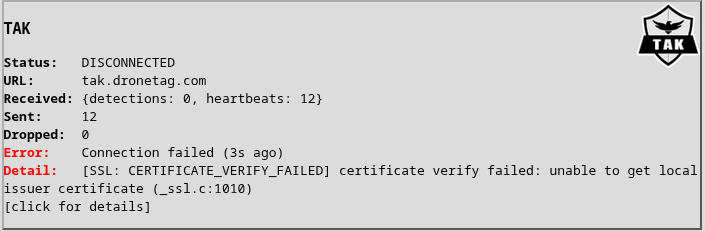
The image on the right shows the error when Scout cannot verify server's certificate. Please note that the CA certificate must be server's root CA. It cannot be an intermediate CA. You have a few solutions
- If you are using p12 bundle and the server's certificate has the same RootCA as the certificate in the bundle then use "P12 Trust Bundled RootCA". This will extract the top-level certificate from the p12 bundle and use it as trusted certificate for verifying the server.
- If you are using p12 bundle (and have "P12 Trust Bundled RootCA" to "No") or not using the p12 at all - in both cases the "Server CA Certificate" will be used in you have checked "Verify Server Cert". Make sure it is the top-level rootCA.
- As a temporary fix, you can uncheck "Verify Server Cert" and "Verify Server Domain/IP" in case of problems and the client will simply accept any certificate that the server gives you. This is not secure at all of course.
Client Certificates
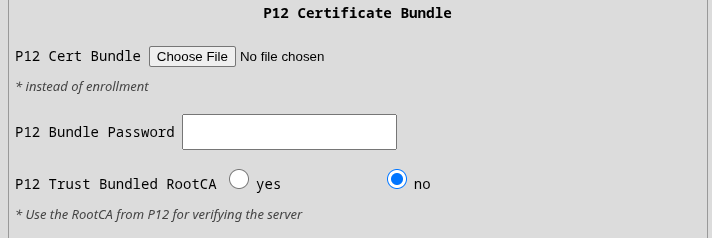
For secured communication from client to server, you must specify "Client Certificate" and "Client Key" either as separate PEM files or in a P12 bundle. If you upload both PEM and P12, only the P12 will be used. Optionally, PEM Key can be password protected. In this case use the "Client Key Password" field. Keys in P12 must not be password protected. Usually the bundle itself is protected hence the field "P12 Bundle Password".
If any of those displayed errors appear that means your client certificates were rejected by the server or are outright invalid.
[SSL: TLSV1_ALERT_INTERNAL_ERROR] tlsv1 alert internal error[SSL: TLSV13_ALERT_CERTIFICATE_REQUIRED] tlsv13 alert certificate required
ENROLLMENT
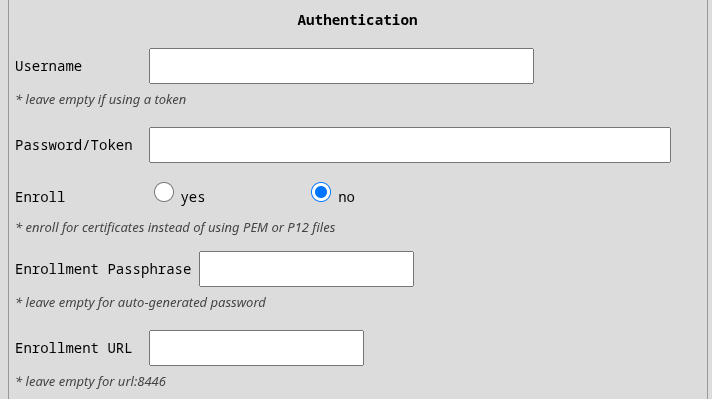
If you don't have certificates but you were given username, password and optionally a passphrase then you should use those in the authentication section together with setting Enroll to "yes". Those credentials are used in standard enrollment process using Marti API on port 8446. We currently do not support custom certificates for secured communication during enrollment but it will be part of the next release. If your enrollment server is running at a different port or even url then use provided Enrollment URL.
TAK Settings
Friendlies: here you can define friendly drones one-per-line by their serial number or MAC address in standard colon-delimited format. You can optionally add callsign under which they will appear on the map. Separate the callsign by a comma. Example:
1596F319B877381F1BBF, blue1
1596F33DEC76E5C15FD3
TAK Data
Scout sends following messages to the server:
Heartbeat
Scout is sending heartbeat every 60s as a friendly ground sensor a-f-G-E-S instead of usual t-x-d-d. This
will place Scout on the map with callsign "SCOUT-<last-4-digits-of-serial-number>" while the uid of those messages is
"<serial-number>-sensor".
Drones
Scout by default marks drones as Unknown affiliation. If the drone's serial number or MAC address were specified in the friendly settings, then they will be marked as Friend. Scout also distinguishes between fixed-wing and rotary drones. So the possible COT types reaching the server are one of
a-u-A-C-F-qresp.a-f-A-C-F-qfor unknown fixed-wing drone resp. friendly onea-u-A-C-H-qresp.a-f-A-C-H-qfor unknown rotary drone resp. friendly one
Drone's callsign is [UA]snxxxx where snxxxx is the last 6digits of drone's serial number. If the serial number is
not available then drone's MAC address is used instead (will have ":" inside).
Drone Operator
Operator is visually linked to their drone by their callsign [OP]snxxxx that shares the drone's serial number.
Operator is also linked to their drone on COT level by the link_to element.
Operator's COT type is a simple ground unit a-u-G-U resp. a-f-G-U if the operator's drone is defined as friendly.
Example
A single Remote ID detection produces up to two CoT events: the UAV track (from the drone's broadcast
location) and a separate operator marker (from the drone's broadcast system message). The operator event
references the drone via its <link> element, so the two appear connected on the map. Below is a real event
pair emitted by a Scout with serial D19D2405DD799BF9B5 for a rotary drone broadcasting UAS ID
MJJE3G894BIQV0Z:
<event version="2.0" type="a-u-A-C-H-q" uid="D19D2405DD799BF9B5-UAS-MJJE3G894BIQV0Z" how="m-g" time="2026-07-23T05:10:57.263681Z" start="2026-07-23T05:10:57.263717Z" stale="2026-07-23T05:11:27.263725Z">
  <point lat="-48.8766700" lon="-123.3933300" le="3.0" hae="403.0" ce="10.0"/>
  <detail>
    <_flow-tags_ pytak-scout="2026-07-23T05:10:57.263739Z"/>
    <contact callsign="[UA]BIQV0Z"/>
    <track track="86.0" speed="0.0"/>
  </detail>
</event>
<event version="2.0" type="a-u-G-U" uid="D19D2405DD799BF9B5-OP-MJJE3G894BIQV0Z" how="m-g" time="2026-07-23T05:10:57.264431Z" start="2026-07-23T05:10:57.264448Z" stale="2026-07-23T05:12:57.264454Z">
  <point lat="-48.8766192" lon="-123.3933311" le="10.0" hae="405.5" ce="5.0"/>
  <detail>
    <_flow-tags_ pytak-scout="2026-07-23T05:10:57.264468Z"/>
    <contact callsign="[OP]BIQV0Z"/>
    <link relation="p-p" type="a-u-A-C-H-q" uid="D19D2405DD799BF9B5-UAS-MJJE3G894BIQV0Z"/>
  </detail>
</event>
Aviation
If your Scout has aviation modules and you enable aviation to be sent to the TAK integration the airplanes will
appear as civilian fixed-wings a-u-A-C-F resp. helicopters a-u-A-C-H. In the UI, you should see their reported
flight number (e.g. EJU39FN). If the flight number is not available then ICAO ID is used (which is a number).
Sapient

Scout uses strictly version "BSI Flex 335 v2.0". The connection is always over a TCP client and can be optionally encrypted using SSL as any other TCP connection.
Currently, Scout supports only Registration command. Future releases will support other commands such as start, stop
and changes in detections diameter.
Forwarding
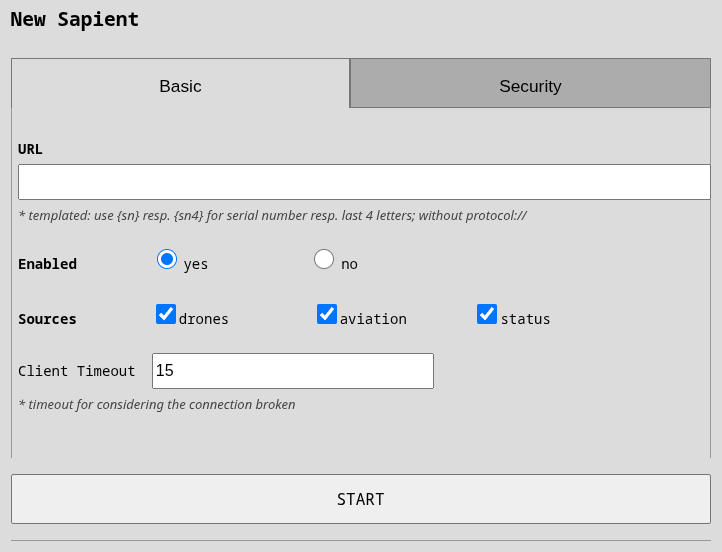
URL: fill in host or IP of your Sapient server. If you are using standard port 8080 then you don't need to specify it.
Sources: you can select which messages will be forwarded to the server. Please note that drones and aviation is restricted by global filter on altitude and radius.
Drones
Scout reports two kind of messages for RemoteID messages
- classification "Air vehicle", subtype "UAV rotary wing" or "UAV fixed wing" for the drone
- classification "EM transmitter", subtype "UAS control station" for the pilot/operator
The operator message is associated to the drone message via associated_detection as type SIBLING.
Both messages have the same object_info:
Technology: possible valuesWB(Wifi Beacon),WN(Wifi NaN),B4(Bluetooth 4),B5(Bluetooth LE)Operator ID: applicable in US and EU regions e.g.FIN87astrdge12k8UAS ID: serial number of the drone or attached RemoteID transmitter e.g.MFR1C123456789ABC
Drones messages contain best available identity in the top-level id parameter.
Aviation
If your Scout has aviation modules and you enable aviation to be sent to Sapient server then
DetectionReport with classification "Air vehicle" -> "Manned fixed wing" or "Manned rotary wing"
will be used together with object_info:
Technology: possible valuesAL(ADS-L),AB(ADS-B),OG(OGN),UT(UAT),FL(FLARM)ICAO ID: 24bit number assigned by ICAO to every manned air vehicleFlight number: string assigned to the current flight of the airplane
Status
Heartbeat is reported every 60s by a standard StatusReport message and right after registration.
Security
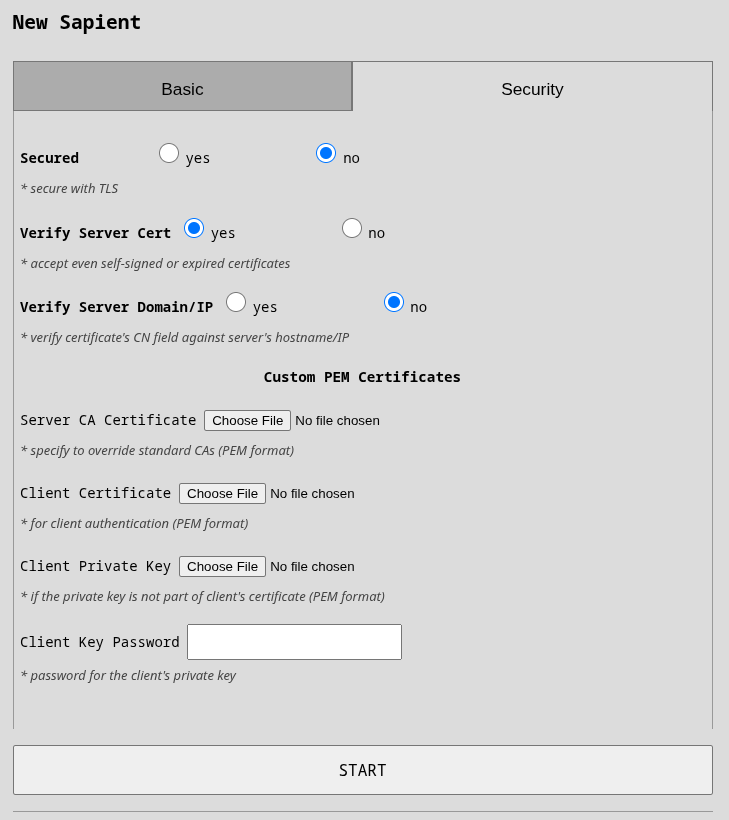
Sapient security depends on certificates and there are no user names and passwords. Our client support custom server and client certificates.
Upon first connection, Sapient client generates a UUID that is deterministically derived from Scout's serial number so it doesn't change even with device restart or power loss.
For details about certificates, please take a look at security section.
FlytBase

FlytBase is an enterprise platform for autonomous, docked-drone fleet operations. Its third-party integrations are called Flinks (FlytBase Links). Through the Dronetag Flink, detections from your Scout appear in FlytBase as intruders inside pre-defined boundaries, giving remote operators live airspace awareness during autonomous and BVLOS missions.
Setting up the Dronetag Flink
-
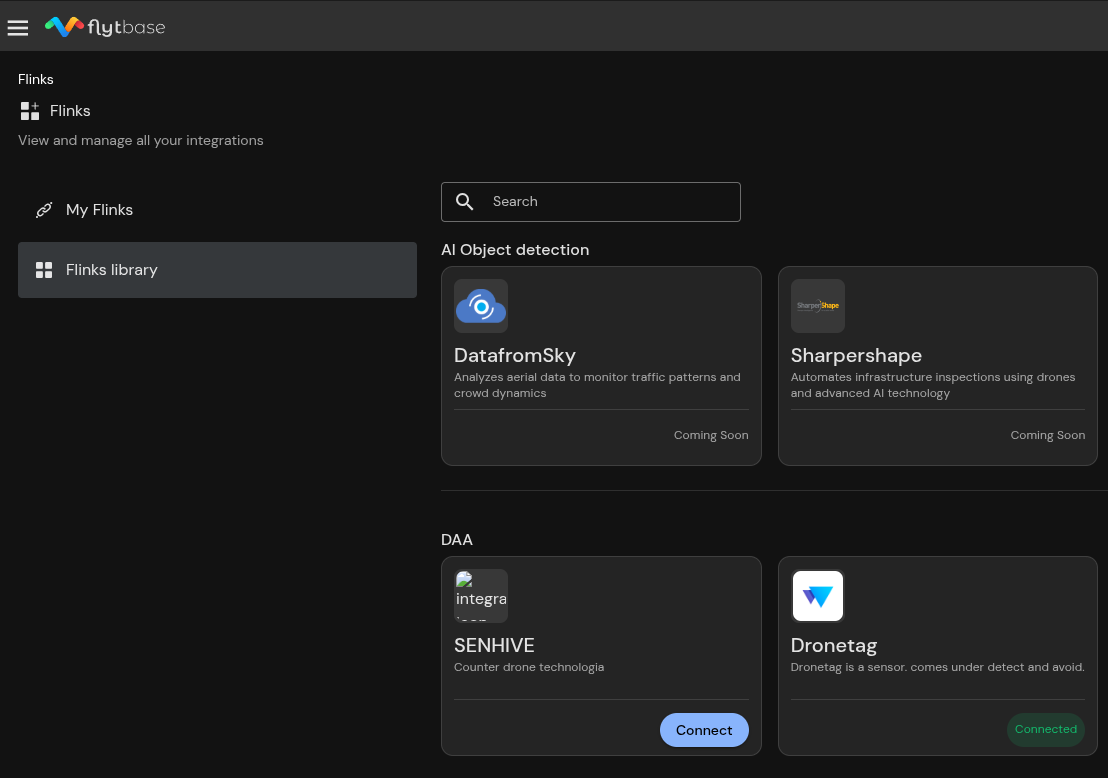
First, you need to register your Scout at FlytBase. Navigate to the Flinks library and connect the Dronetag Flink.
-
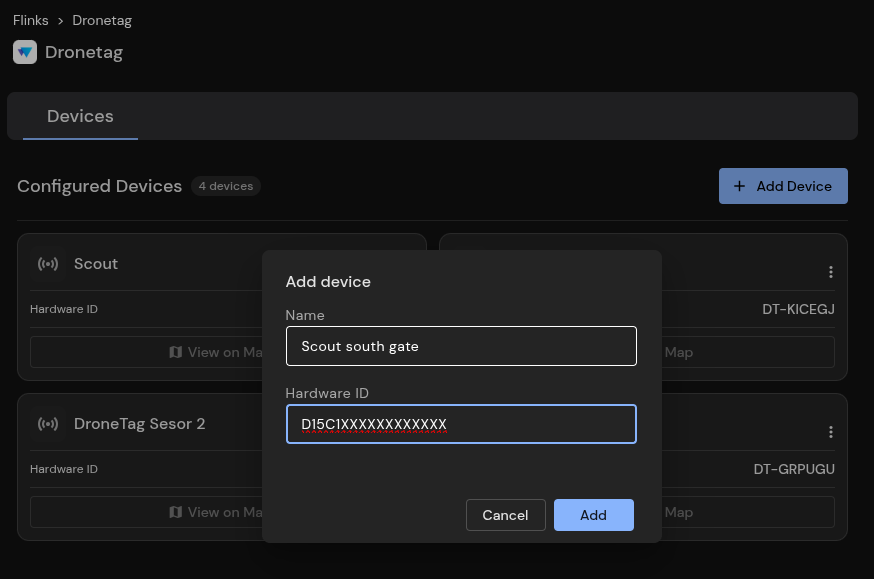
Head to the Dronetag Flink and add your Scout. The name is arbitrary; Hardware ID must be your Scout's serial number.
-
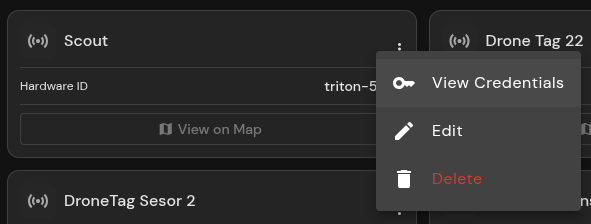
Once the device is added to the Flink, you can display the credentials needed on the Scout side.
-
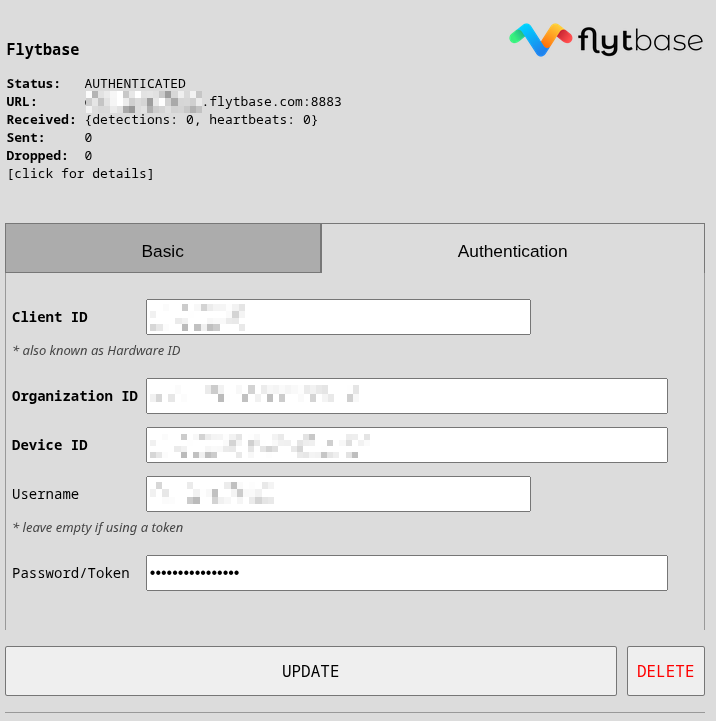
In Scout's UI, head to Forwarding and add the FlytBase integration. Copy each credential into the matching field of the Authentication tab and the URL into the Basic tab.
-
Upon saving, the integration verifies the credentials and switches to the "AUTHENTICATED" state. If all credentials and the URL were configured correctly, detections will start appearing in the FlytBase platform.
SafeSky

SafeSky is an airspace awareness network used by general aviation pilots and drone operators. With this integration, Scout publishes its detections directly into the SafeSky network, so drones and aircraft detected by your Scout appear as live traffic to all SafeSky users around you.
The integration is preconfigured to work with the production SafeSky environment out of the box - no API key or URL needs to be entered. Traffic published by the Scout is credited to Dronetag as the source.
Configuration
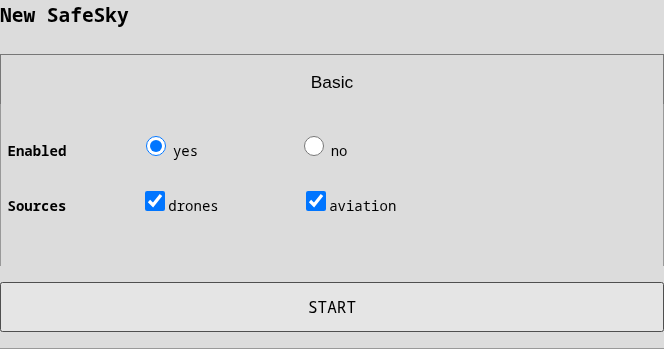
- In Scout's UI, head to Forwarding, add the SafeSky integration and press Start.
- In Sources, keep
dronesand (un)checkaviationdepending on whether you want the surrounding air traffic received by your Scout to be shared as well.
Expert mode additionally reveals the API Key and URL fields for using your own SafeSky key or a different environment; the stored key is only ever displayed masked.
Upon saving, the integration verifies the key by reading back the surrounding traffic and switches to the "AUTHENTICATED" state. Detections should then appear in the SafeSky app within seconds.
SafeSky Data
Every detection is published as a SafeSky beacon, batched once per second, and each aircraft is updated at most once per second.
Drones
A drone detected via RemoteID appears in SafeSky with the UAV beacon type, identified by its serial
number (CTA-2063-A) - or by the RemoteID transmitter address when no serial is broadcast.
The drone's position, altitude, speed, course, vertical rate and airborne/grounded status are forwarded when available. The call-sign is the drone's SelfID text (reduced to letters and digits, which is what SafeSky accepts); a drone that broadcasts no SelfID gets the tail of its serial number instead. The altitude is the drone's geodetic (GPS) altitude converted to metres above mean sea level with the onboard EGM96 geoid model, exactly as SafeSky expects; the barometric (pressure) altitude is only a fallback since it drifts with the weather.
Aviation
If your Scout has aviation modules, detected aircraft are published with their real classification - MOTORPLANE, HELICOPTER, GLIDER,
BALLOON and so on - and the receiving technology (ADS-B, OGN, FLARM) as the transponder type, so
they appear correctly on SafeSky maps instead of being shown as drones. The ICAO address identifies the
aircraft and the flight number is forwarded as the call-sign.
Limitations
The SafeSky API has no representation for the receiving sensor itself nor for the drone operator, so unlike TAK or Sapient, this integration sends no Scout heartbeat and no operator position - only the detected aircraft are shared.
BEAST (raw ADS-B stream)

BEAST forwards the raw binary ADS-B stream produced by the Scout's aviation receiver to your own server.
Unlike the other integrations, nothing is decoded or converted on the way - your server receives the exact BEAST
frames coming from the receiver, so you can feed any standard ADS-B consumer such as readsb, dump1090's
--net-ri-port, Virtual Radar Server, or a feeder of an aggregator network.
The BEAST integration is only offered on Scouts that have an aviation module installed. If you don't see it in the catalogue of integrations, your Scout has no aviation module provisioned.
Basic settings
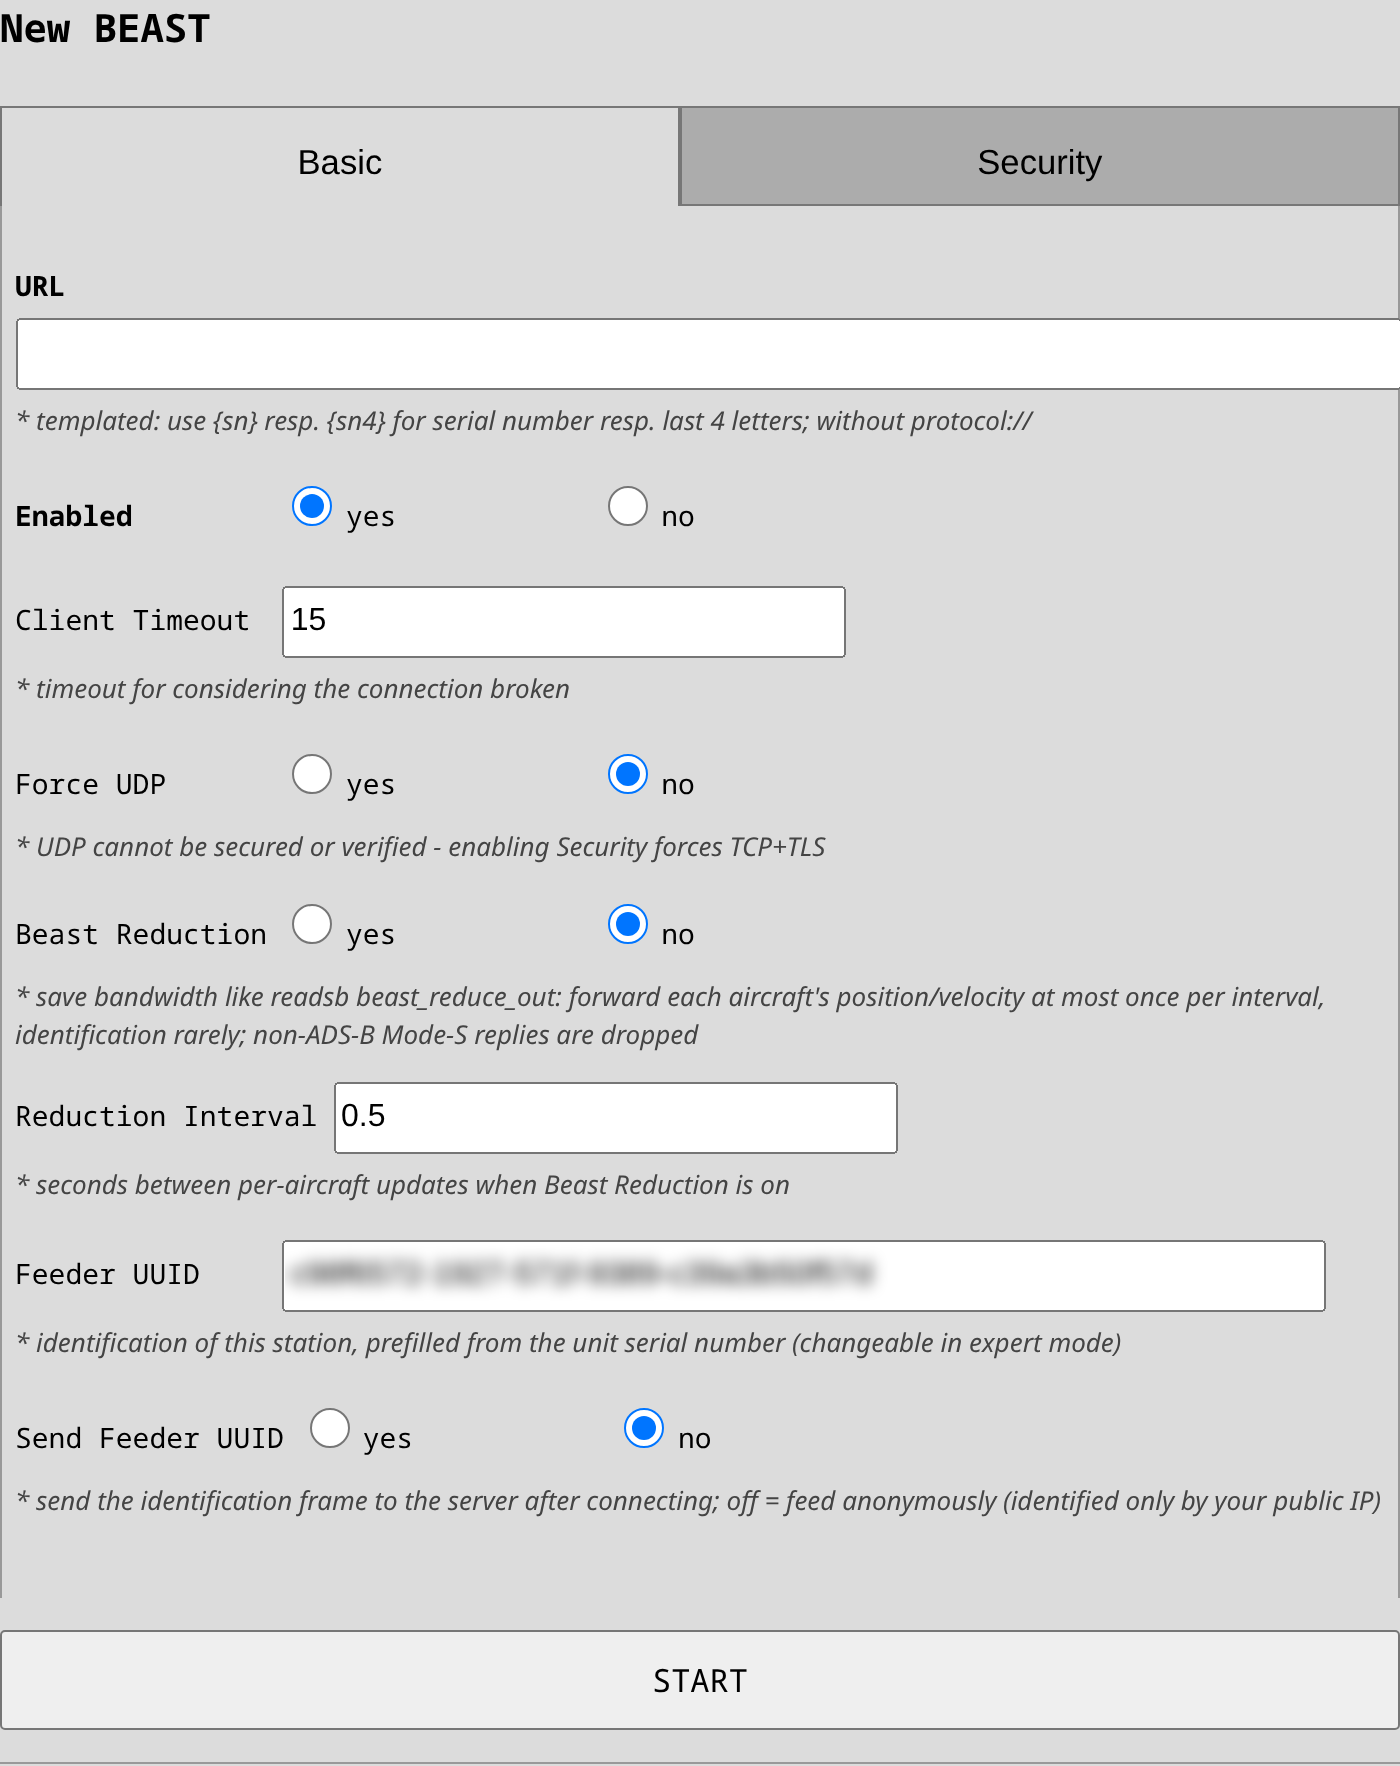
URL: host or IP of your server. If you don't specify a port, the ADS-B standard port 30005 is used.
Force UDP: sends the frames as UDP datagrams instead of a TCP connection. Every datagram carries only whole BEAST frames. UDP cannot be secured nor verified (connection failure will never be reported).
Beast Reduction: saves bandwidth the way readsb's beast_reduce_out does - each aircraft's position and
velocity are forwarded at most once per interval (0.5 s by default, changeable in expert mode via
Reduction Interval) and identification messages only rarely. Trade-off: because the relay does not fully
decode Mode-S, replies whose aircraft address is not in the clear (non-ADS-B surveillance and Comm-B replies)
are dropped entirely in reduced mode - leave the reduction off if your server should track Mode-S-only targets.
Feeder UUID: identification of this station, prefilled with a UUID deterministically derived from the unit's serial number (editable in expert mode). It is only transmitted when Send Feeder UUID is enabled - with the switch off you feed anonymously: data is identified only by your public IP.
Security settings
Enabling Security forces TCP and wraps the connection in TLS, overriding "Force UDP". Server verification and client certificates work exactly as described in the TAK security section - use "Server CA Certificate" for a private CA and "Client Certificate" + "Client Private Key" if your server requires mutual TLS.
Data
The relay is a live feed: when your server is unreachable or too slow, frames are dropped (always whole frames, so the stream stays decodable) and forwarding resumes automatically once the connection recovers. Nothing is buffered or replayed. The stream also pauses briefly whenever the receiver restarts, for example after a GNSS position change.
The global Aviation limits (tracking/ignore radius and altitude on the Sensors page) do not apply here: the relay forwards the raw, undecoded BEAST stream, which carries no positions to filter on. Every frame the receiver hears goes to your server regardless of distance or altitude.
ADSBExchange

This integration feeds ADS-B Exchange with the raw BEAST stream from your Scout's aviation module - no ADS-B Exchange feeder software is needed on the Scout. It is a preconfigured variant of the BEAST integration, so everything described in the BEAST tab (live feed, whole-frame delivery, automatic reconnects) applies here too.
Like BEAST, this integration is only offered on Scouts that have an aviation module installed.
Basic settings
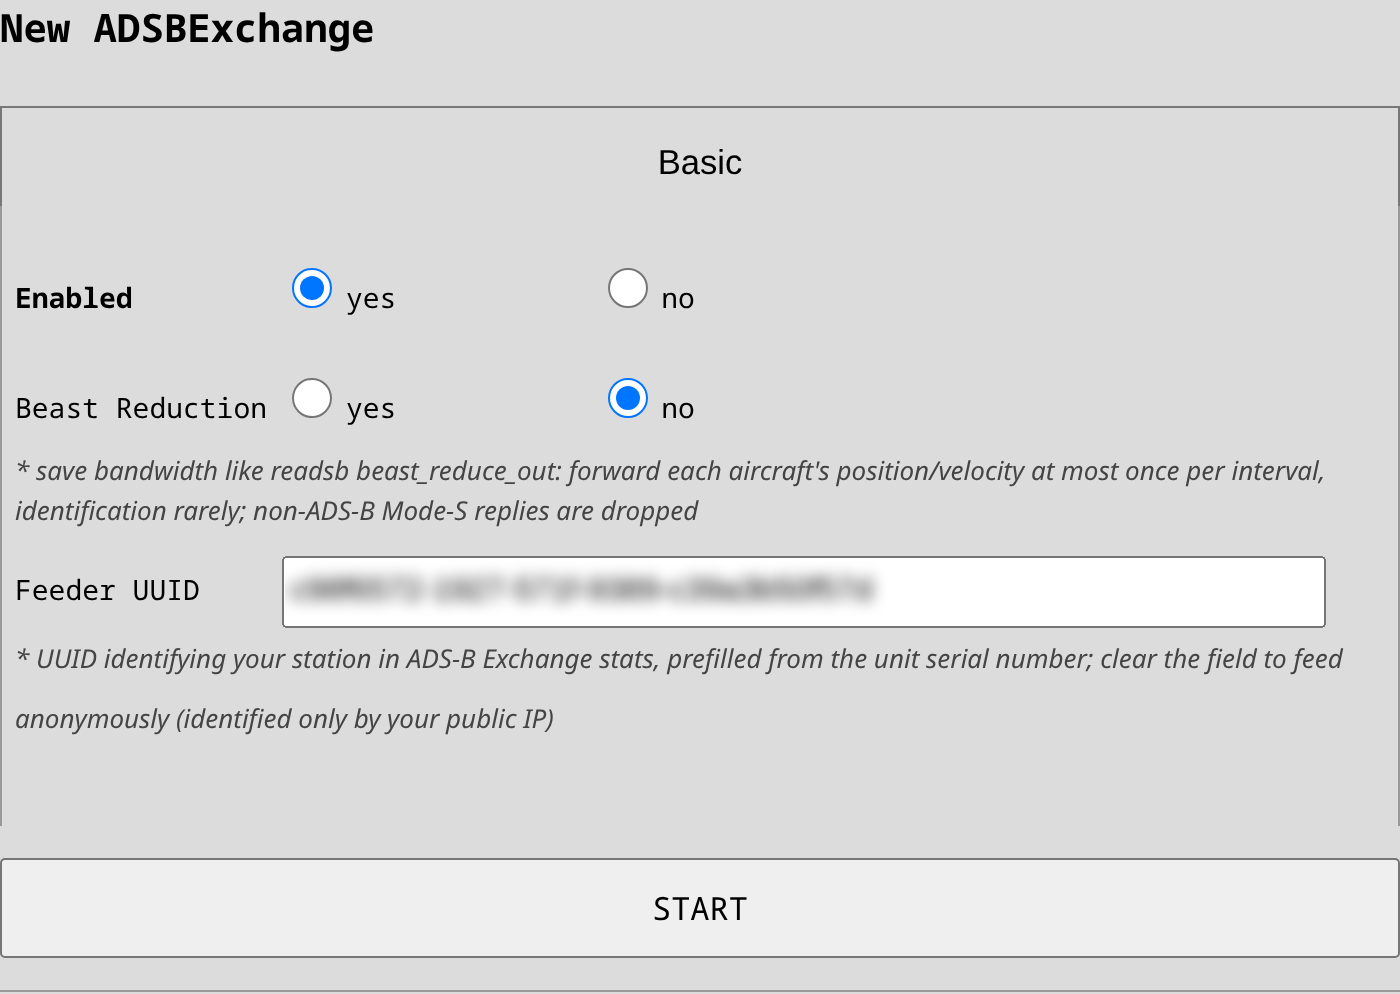
URL: prefilled with the ADS-B Exchange ingest server (feed1.adsbexchange.com:30004). It is only
changeable in expert mode and you should not need to touch it unless ADS-B Exchange announces a different
ingest host.
Beast Reduction: works here as well - ADS-B Exchange's own feed client reduces with the same 0.5 s interval by default, so enabling it is a safe way to save upstream bandwidth (see the BEAST tab for the Mode-S-only trade-off).
Feeder UUID: identifies your station at ADS-B Exchange and is always transmitted here. It comes prefilled with a UUID deterministically derived from the unit's serial number, so it stays stable across reinstalls; it is editable in expert mode. If you clear the field, you are feeding anonymously - the data is still contributed, but the station is identified only by its public IP address (you can check it at adsbexchange.com/myip).
Linking the feeder to your ADS-B Exchange account
Link your Scout by its Feeder UUID, not by IP: a Scout on an LTE uplink sits behind carrier-grade NAT,
so its public IP address is shared with other customers and changes over time - IP-based matching (the
/myip/ page) is unreliable there. The UUID travels inside the feed itself and identifies the station
regardless of the network.
- Copy the Feeder UUID from the integration settings.
- Sign in (or sign up) at account.adsbexchange.com and open the Receivers page.
- Paste the UUID into the Feed UID field of Link your receiver (optionally enable the "Device Down" notification) and press LINK RECEIVER.
- The receiver appears in Linked receivers and counts as active once it has been connected to their network within the past 24 hours; an active receiver also grants the account ad-free access to their map.
There is no registration step on the Scout itself - the UUID is the identity. The integration status
also shows the matching Feeder ShortID (ADS-B Exchange's short code derived from the UUID) together
with your personal map link globe.adsbexchange.com/?feed=<ShortID> where you can watch the traffic your
Scout contributes.
What is and isn't fed
The Scout relays the complete ADS-B BEAST stream (positions, identification, velocities including the
receiver timestamps) - like BEAST, unfiltered by the global Aviation limits, which cannot apply to the
raw undecoded stream and also uploads the decoder statistics the same way the official
adsbexchange-stats package does, so your per-UUID stats page and their map coverage work without any
ADS-B Exchange software on the Scout. MLAT is not supported - it requires ADS-B Exchange's own
mlat-client and a different protocol. ADS-B Exchange accepts ADS-B-only feeds without MLAT.
OGN (Open Glider Network)

The Open Glider Network (OGN) is a community network of ground receivers tracking gliders and other light aircraft equipped with OGN-compatible trackers. A Scout with an aviation module already receives this traffic for its own detections; with this integration enabled, the Scout additionally relays everything it receives up to the public OGN network (APRS-IS), acting as a regular OGN receiver station and contributing to the network's coverage in your area.
This integration is only shown on Scouts equipped with an aviation module - without one there is no OGN traffic to contribute. No additional license is needed.
Privacy
Unlike the other integrations, which push data to a server of your choice, OGN is a public network: everything your Scout relays becomes publicly visible, e.g. on live tracking sites such as OGN Live. The integration is therefore disabled by default and must be explicitly enabled per device.
Configuration
- In Scout's UI, head to Forwarding and add the OGN integration.
- Callsign: the station name under which your Scout appears in the OGN network (max 9 characters). It defaults to the first 9 characters of your Scout's serial number - only change it if you want a specific station name (e.g. an airfield ID).
- Keep URL at the default
aprs.glidernet.orgunless you run your own APRS-IS server.
The station position is taken automatically from the Scout's GNSS receiver - there is nothing to configure.
OGN Data
The relay is transparent: the aviation beacons received by the aviation module are forwarded to the OGN network verbatim, together with the receiver status and position beacons, so your Scout appears in OGN as a standard receiver station under your configured callsign. Drone detections (RemoteID) are never sent to OGN.
DJI O4 Ground Station
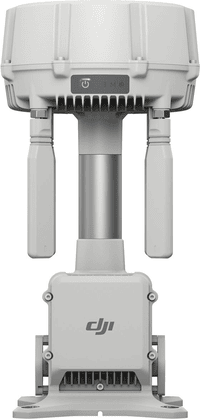
The DJI O4 Ground Station can show the drones your Scout detects. The Scout connects to the station over the DJI Edge SDK (ESDK V2), and the station forwards the detections to DJI FlightHub 2, where they appear as airspace alerts next to your own aircraft.
Before you start
You need three things:
- An Edge SDK application registered on the DJI Developer Center. The next section describes how to create it.
- The ground station activated and in Gateway Mode. Activate it over USB-C with the DJI Enterprise app. Press the power button three times to switch modes - the mode indicator is purple in Gateway Mode and blue in Relay Mode, which has no cloud connection.
- The station joined to a FlightHub 2 project. Airspace alerts live inside a project. A station that shows "No project joined" ingests the data but draws nothing on the map.
The station accepts third-party receivers only from a recent firmware. On an older firmware the broker is simply not there: nothing listens on port 1883, the station sends no discovery broadcast, and the Scout reports that it found no ground station. Update the station in the DJI Enterprise app before you start, and give it a moment to restart afterwards.
The ground station is the MQTT broker, not a client. The Scout connects to the station, so neither the Dronetag cloud nor the DJI cloud sits in this path. Detections travel from the Scout to the station on your own network, and only the station talks to FlightHub 2.
Registering the Edge SDK application
The Scout identifies itself to the ground station with the credentials of an Edge SDK application. Create the application once on the DJI Developer Center. One application can serve more than one Scout.
Open Developer Center -> Apps and press CREATE APP. Set App Type to Edge SDK first. The form then drops Software Platform and Package Name, which only a Mobile SDK application needs, and asks for three values:
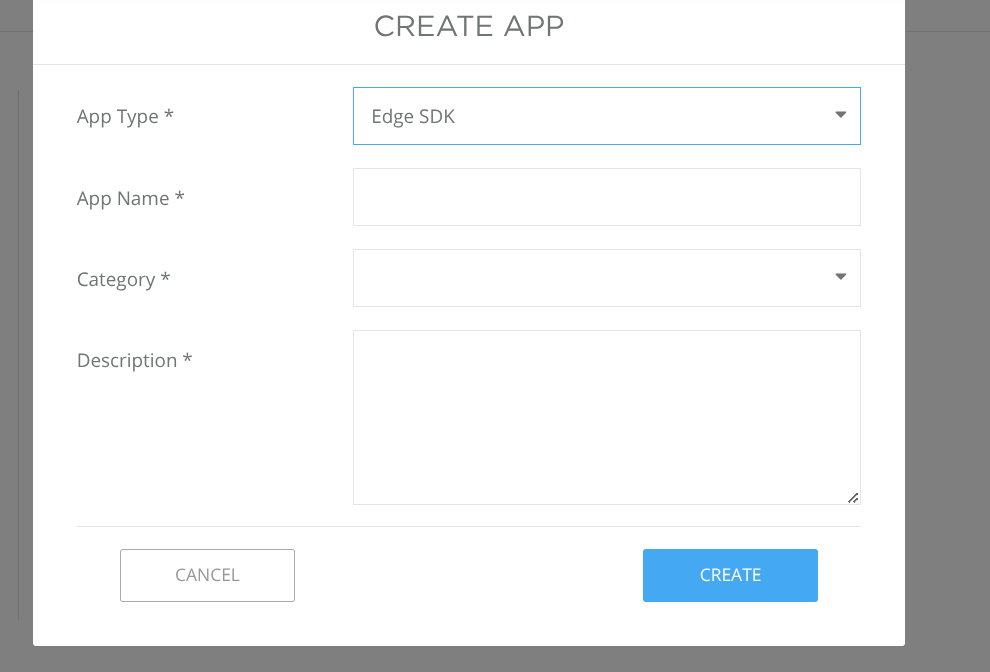
App Name: your own name for the application. It does not affect the connection.
Category: the closest match from the list. Remote ID describes this use.
Description: free text.
App Type must be Edge SDK. A Cloud API or Mobile SDK application issues a different kind of credential, and the ground station rejects it.
DJI then sends an activation e-mail. Confirm it before you go on, because the license stays empty until you do.
Open the application again to read its credentials. The App Information page holds the three values that the Scout needs:
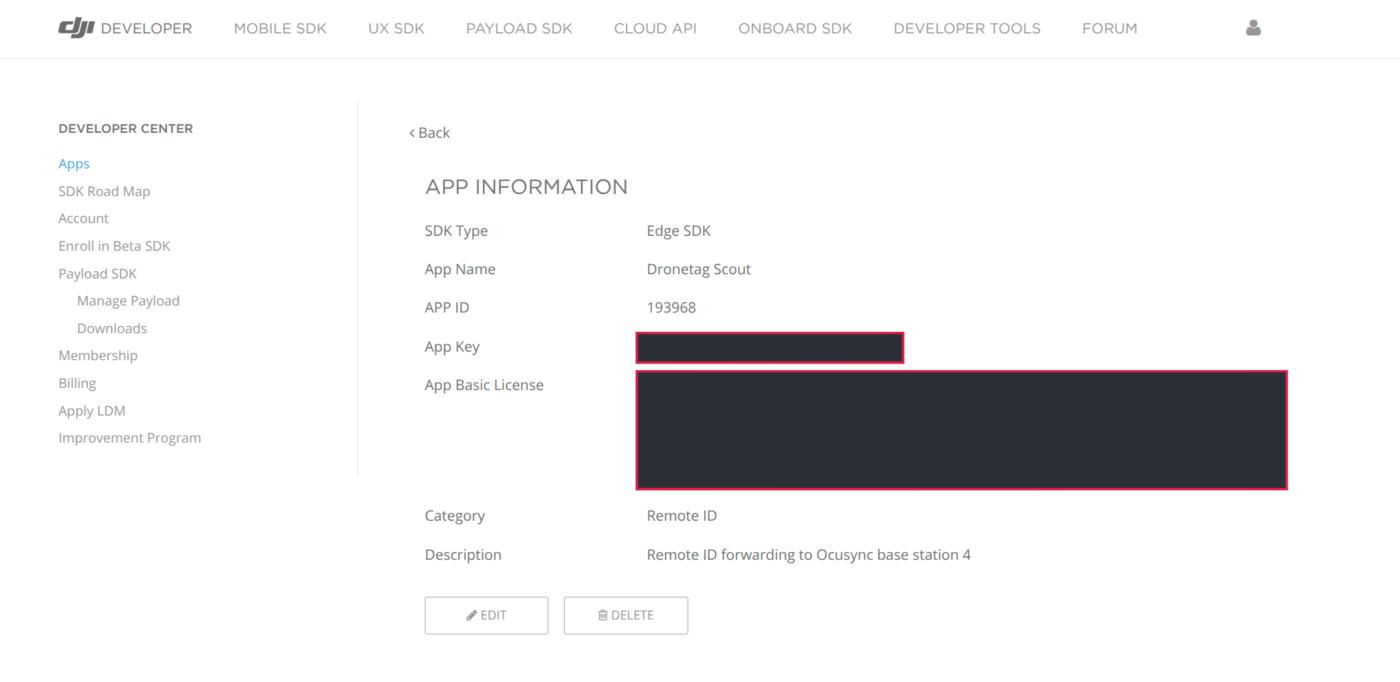
- APP ID - a short number.
- App Key - a hexadecimal string.
- App Basic License - a long block of base64 text. Copy all of it, up to the final
==.
Keep this page open. You paste the three values into the Scout form in the next section but one.
The App Key and the App Basic License are secrets, and this page is the only place that shows them. Anyone who holds them can act as your application. Do not paste them into a support ticket, and hide them in any screenshot you share. The two values are masked in the image above for that reason.
Connecting the Scout
Put the Scout on the same network as the ground station. Connect the station with its WAN port (the left network port), which is the port that also carries its connection to FlightHub 2, and give the Scout an address on that same network.
You do not need to look the station up. It announces itself on the network about every ten seconds, and the Scout listens for that announcement, so the broker address stays empty in the form. The Scout remembers the last address it heard, so it still reconnects after a restart while the station is switched off.
The station's LAN port is not used for this. It serves the station's own downstream equipment, and a Scout connected there sits on a separate network from the rest of your fleet.
Configuration
The Scout listens for the station's broadcast, so it knows when a ground station is on the network. When it finds one that is not configured yet, the Forwarding page offers it:

Until a station answers, the integration stays greyed out in the list of integrations, with the reason shown:

Press Configure, or add the integration by hand. The form has two tabs. The Basic tab holds the connection and what to send:
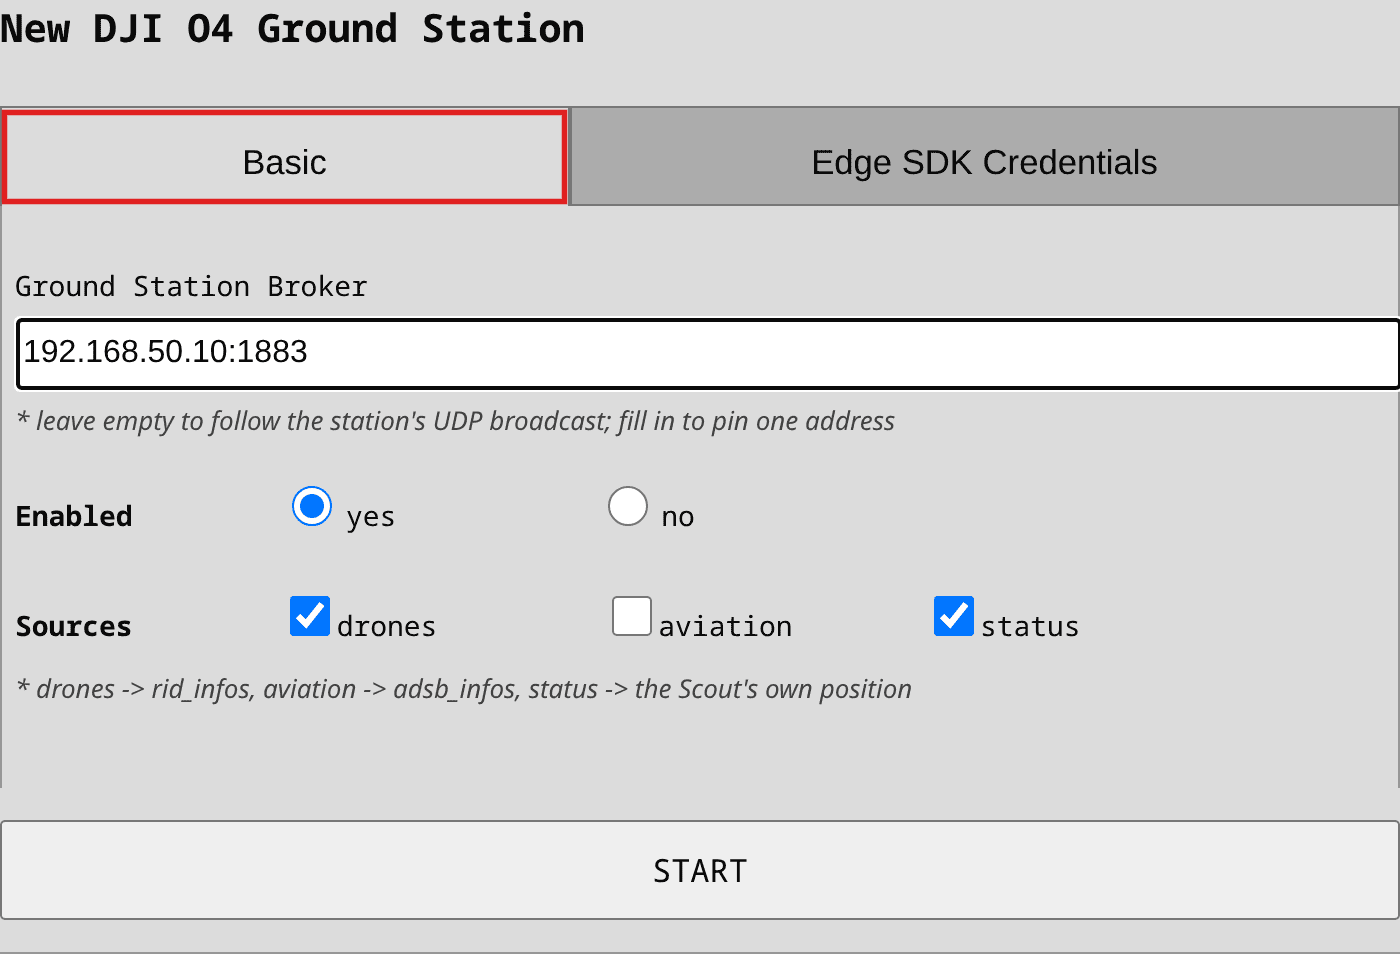
Ground Station Broker: leave it empty. The Scout then follows the station's announcement and
keeps working when the router gives the station a different address. Fill it in only to pin one
address, as host:1883, when the announcement cannot reach the Scout.
Sources: drones sends the Remote ID detections, aviation sends the surrounding air traffic
from the aviation modules, and status supplies the Scout's own position. Keep status - FlightHub
centres the alert circle on it. The aviation option only appears on a Scout with an aviation module.
The Edge SDK Credentials tab holds what identifies this Scout to the station:
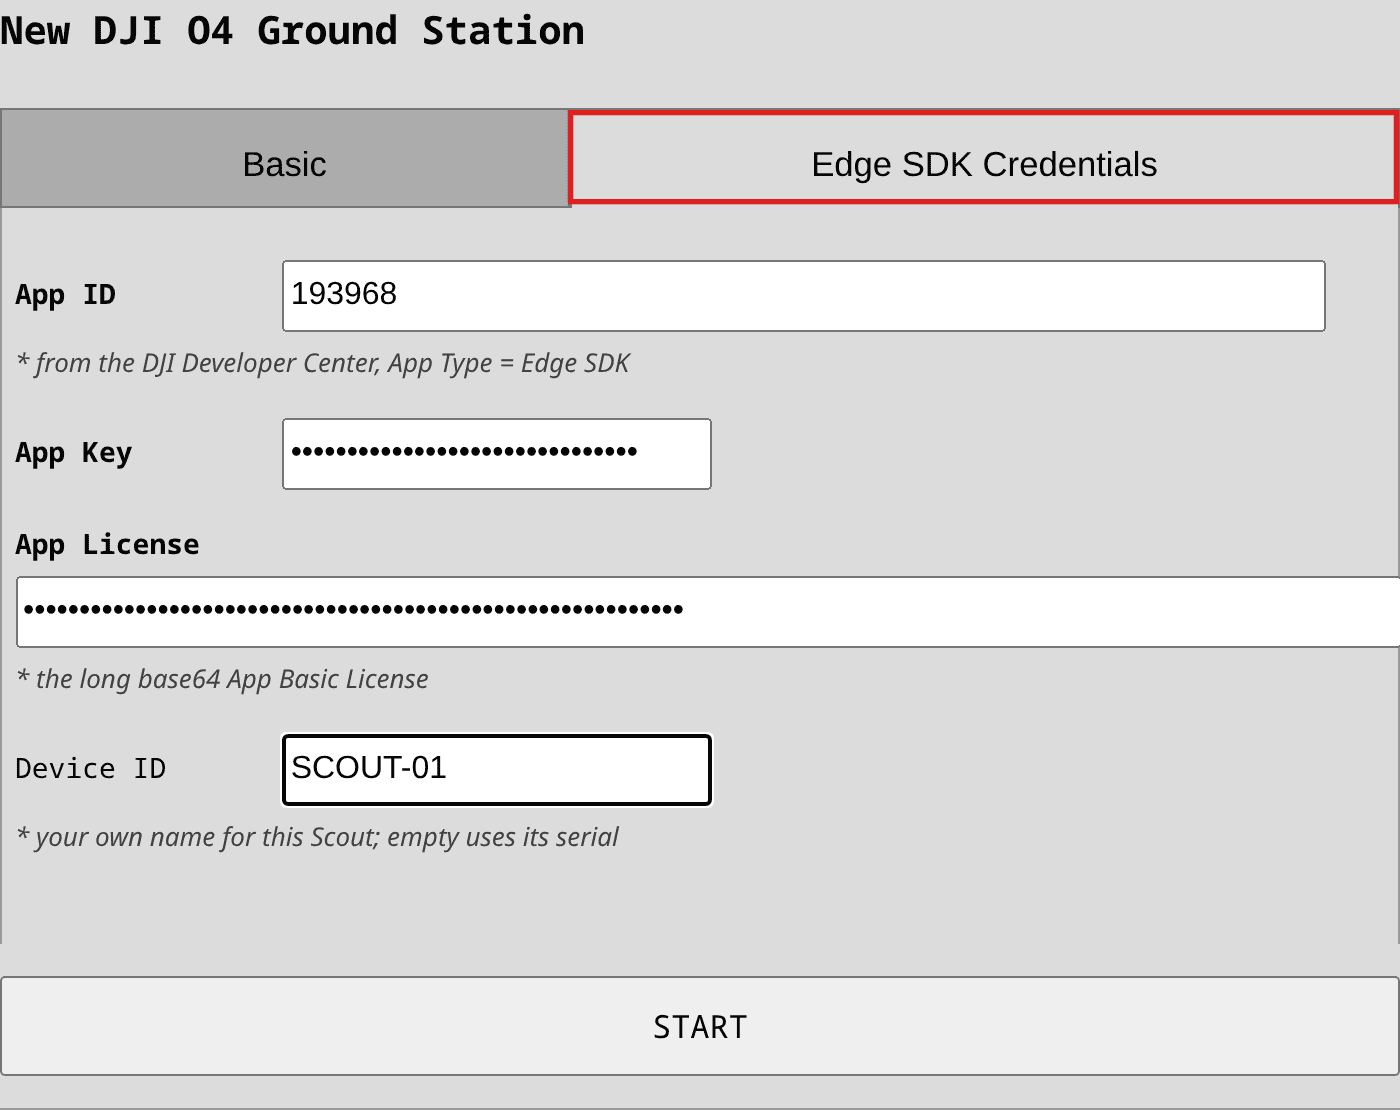
App ID, App Key, App License: copy them from the App Information page of your Edge SDK application. The key and the license are stored masked and never shown again.
Device ID: your own name for this Scout. Leave it empty to use the Scout's serial number. It becomes part of the identity the station authenticates, together with the App ID.
Press Start. The Scout declares what it can deliver and waits for the station to accept it. The tile switches to "AUTHENTICATED" once the station answers. A refusal is shown on the tile with the reason the station gave.
Enabling the alerts in FlightHub 2
Open your FlightHub 2 project and go to Airspace Safety -> Airspace Alert. Turn on DJI O4 Ground Station, then choose which Detection Types to show and set the Alert Distance Threshold:
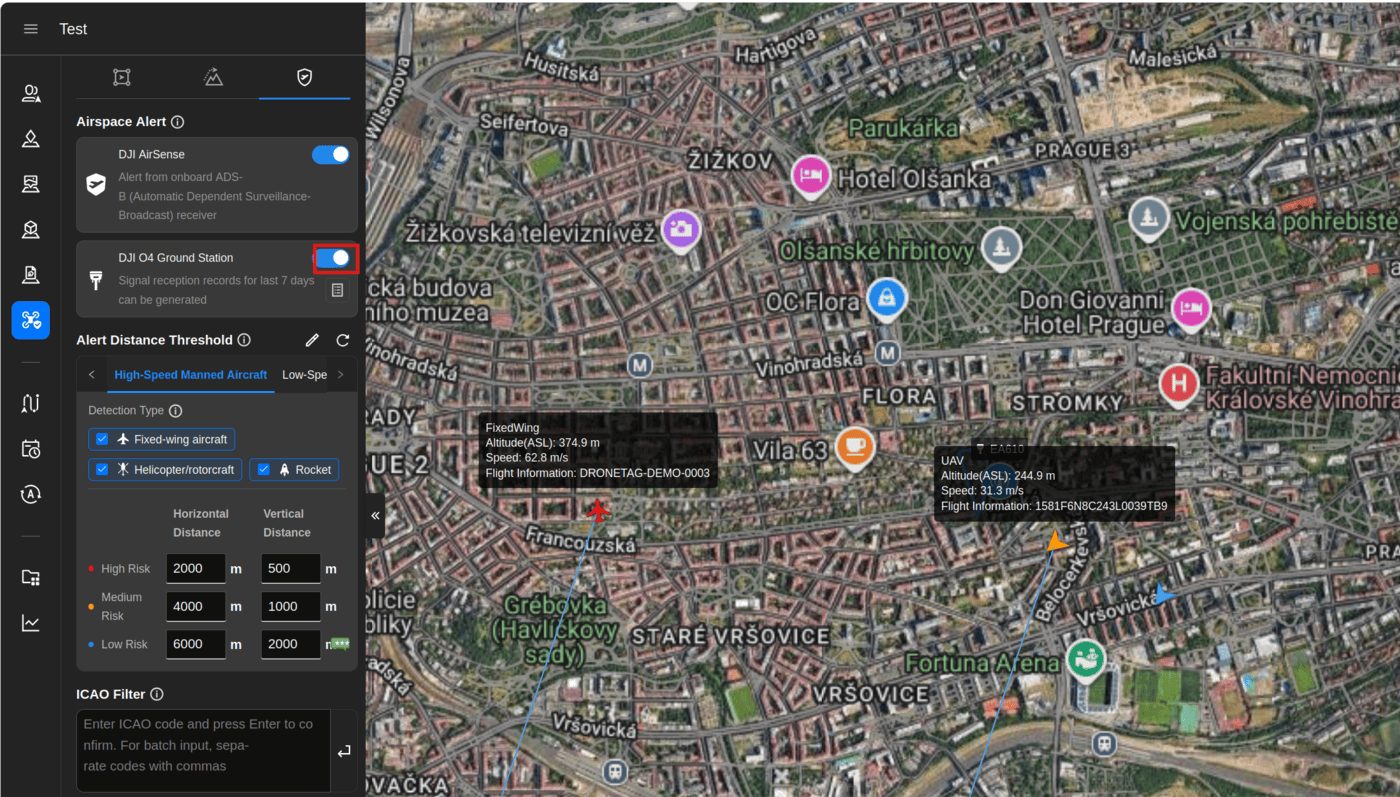
FlightHub draws a circle and shows every target inside it. The centre is the Scout's own position
(the status source), and the radius is the alert distance threshold. A detection outside the
threshold, either horizontally or vertically, is not drawn.
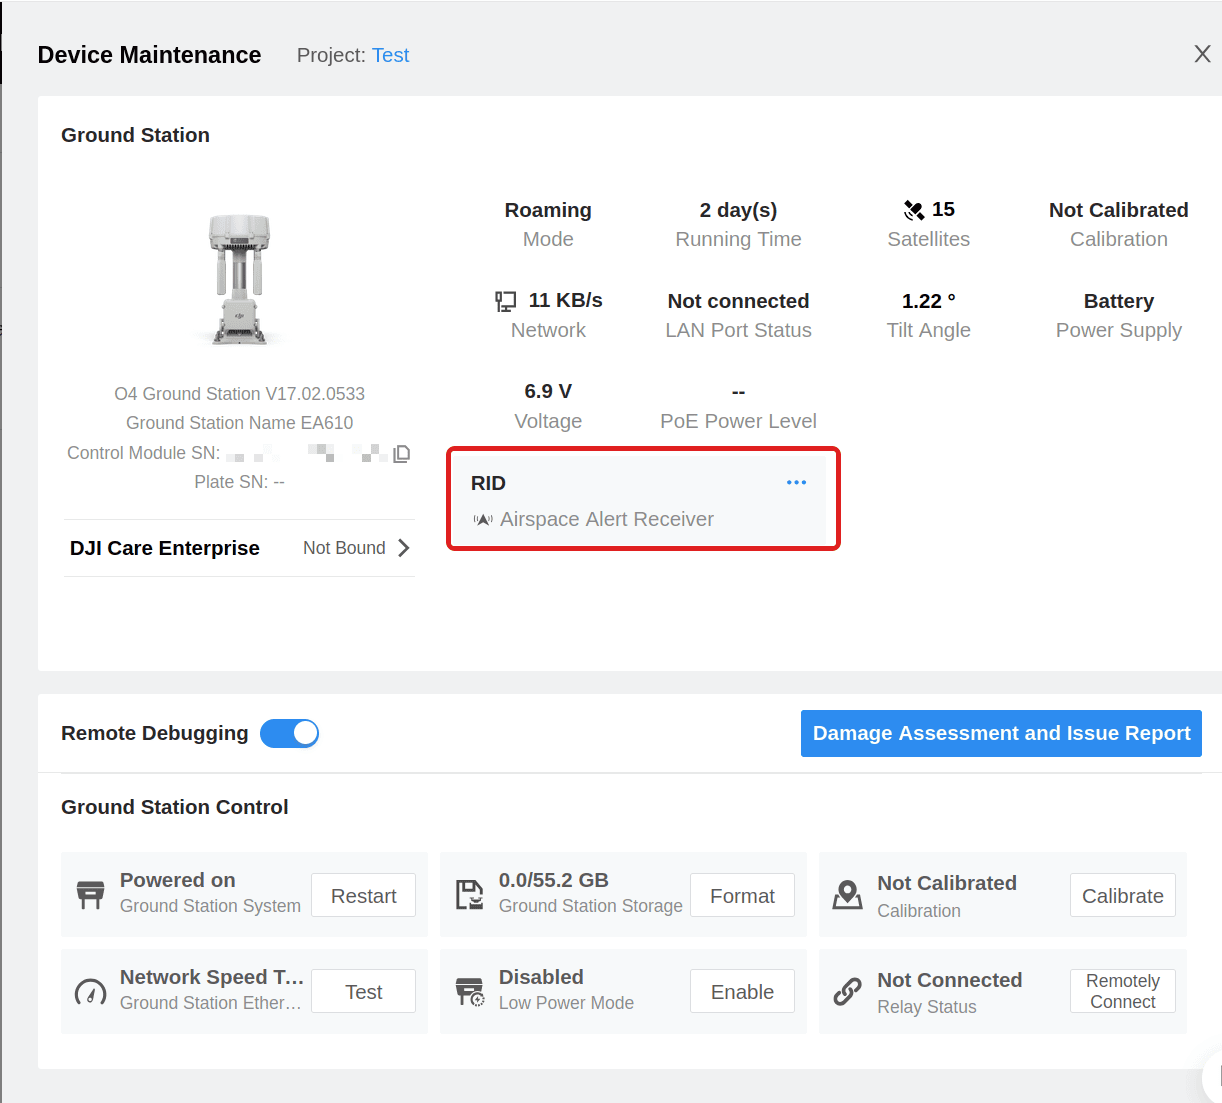
You can confirm the link on the Device Maintenance page, where the Scout appears under the ground station as an Airspace Alert Receiver:
DJI Data
The Scout collects the detections and reports them every two seconds, as DJI requires. Drones and aviation travel on separate reports, each on its own two-second cycle. A drone heard several times inside one cycle is reported once, with its newest position.
Drones
Each drone is reported with its Remote ID serial number, its position, its geodetic and barometric altitude, its height above the take-off point, its course, its horizontal and vertical speed, its flight status and the signal strength the Scout measured. The operator position is included when the drone broadcasts it. FlightHub shows the serial number as "Flight Information".
Aviation
With aviation enabled, aircraft received by the aviation modules are reported with their ICAO
address, call sign, altitude, position, ground speed, heading and vertical rate.
Every DJI drone already carries AirSense, which receives manned ADS-B traffic on its own. The aviation feed is therefore optional, and it is switched off by default. Remote ID is the part AirSense cannot deliver.
Troubleshooting
The integration stays greyed out. No ground station answered. Check that the Scout and the station are on the same network, that the station is activated and in Gateway Mode, and that its firmware is up to date. A switch that does not forward broadcasts also hides the station - in that case fill the station's address into Ground Station Broker by hand.
The tile shows a refusal. The station rejects a report it cannot read and names the field it objected to. The reason is shown on the tile.
FlightHub shows nothing although the tile says AUTHENTICATED. The data reaches the station but has nowhere to be drawn. Confirm in this order:
- The station is joined to a FlightHub 2 project.
- DJI O4 Ground Station is enabled under Airspace Safety -> Airspace Alert.
- The Detection Type includes the kind of aircraft you expect to see.
- The Alert Distance Threshold is large enough, vertically as well as horizontally.
Skydio

Skydio DFR Command is a Drone as First Responder platform. With this integration, Scout pushes its detections into Skydio Cloud as Markers, so drones and aircraft detected by your Scout appear live on the map view of Remote Flight Deck - the same way Skydio displays Axon Dedrone or gunshot-detection feeds.
Rich drone markers use Skydio's UAS detection marker type, which carries the drone's position, the pilot position and the manufacturer/model fields. That marker type is a Skydio feature that must be enabled for your organization by Skydio - contact Skydio support to turn it on. Until it is enabled, Scout automatically falls back to plain incident markers (the detection still appears on the map, with the details in the marker description), and the integration tile shows a note that UAS detection is not enabled.
Getting an API token
The integration authenticates with a Skydio Cloud API token. There are two ways to get one. The integration panel is the quicker way, and it sets the permissions for you. Create the token by hand only if your Skydio Cloud does not list the integration yet.
- Predefined integration
- Creating the token by hand
Skydio Cloud ships a ready-made Dronetag Scout integration. It fills in the name, the group and the permissions, so you only confirm it.
-
Open Skydio Cloud and select Integrations in the left menu. Only users with the Organization Admin cloud role can add an integration.
-
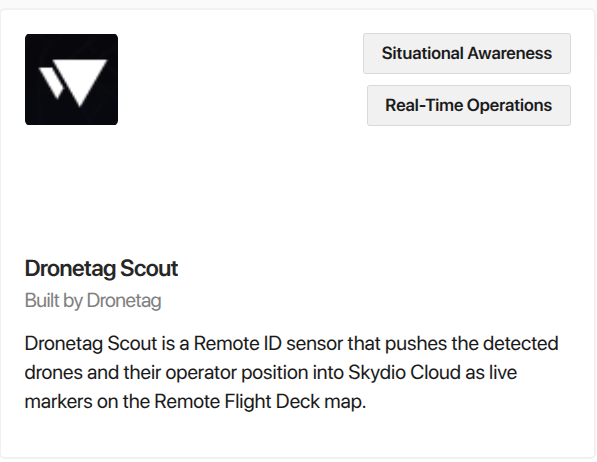
Stay on the Available tab and find the Dronetag Scout card, built by Dronetag. The cards are in alphabetical order, so it sits between DroneSense Live Streaming and Enforsys:
-
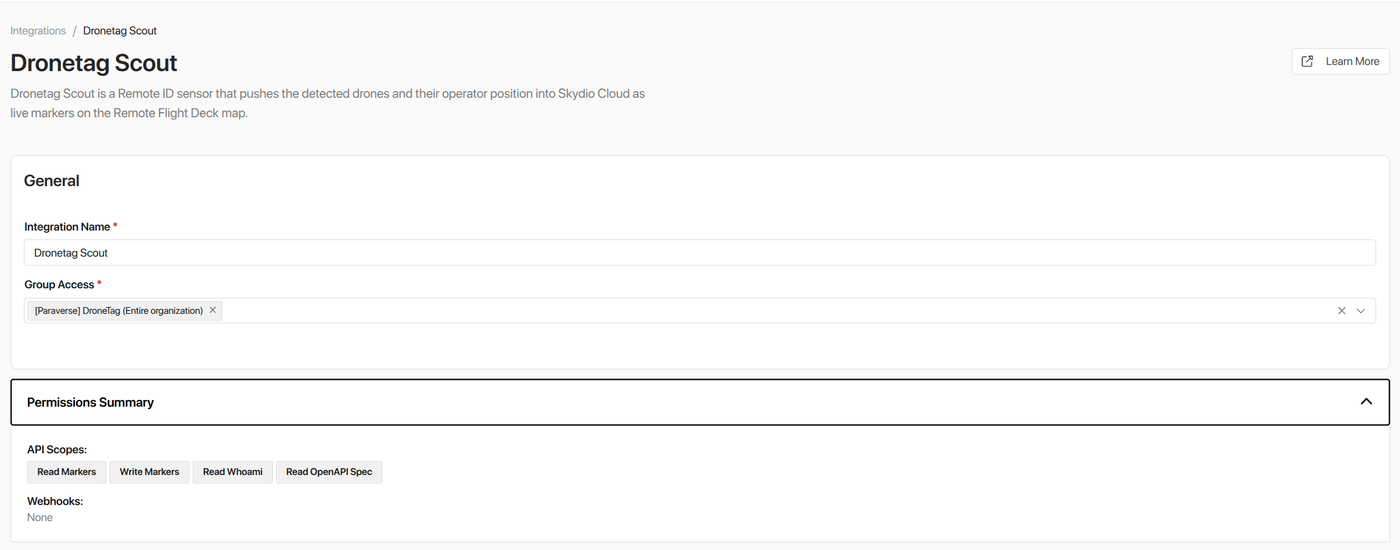
Select the card. The panel opens with Integration Name and Group Access already filled in:
-
Keep Group Access at your entire organization, unless you restrict Skydio access by group.
-
Expand Permissions Summary to see what the token will carry. The panel requests the API scopes
Read Markers,Write Markers,Read WhoamiandRead OpenAPI Spec, and no webhooks. These are the same rights as the manual token in the other tab, so you do not set them yourself. -
Select Configure. Skydio creates the integration and issues its API token. Copy the token into the Scout, as Configuration below describes.
The integration then moves to the Configured tab. Open it there at any time to read its Token ID, to change the group access, or to remove the integration again.
Use this route if your Skydio Cloud has no Dronetag Scout card. Follow the steps from Skydio's API Authentication guide:
-
Open Skydio Cloud and sign in. Note that only users with the Organization Admin cloud role can create API tokens.
-
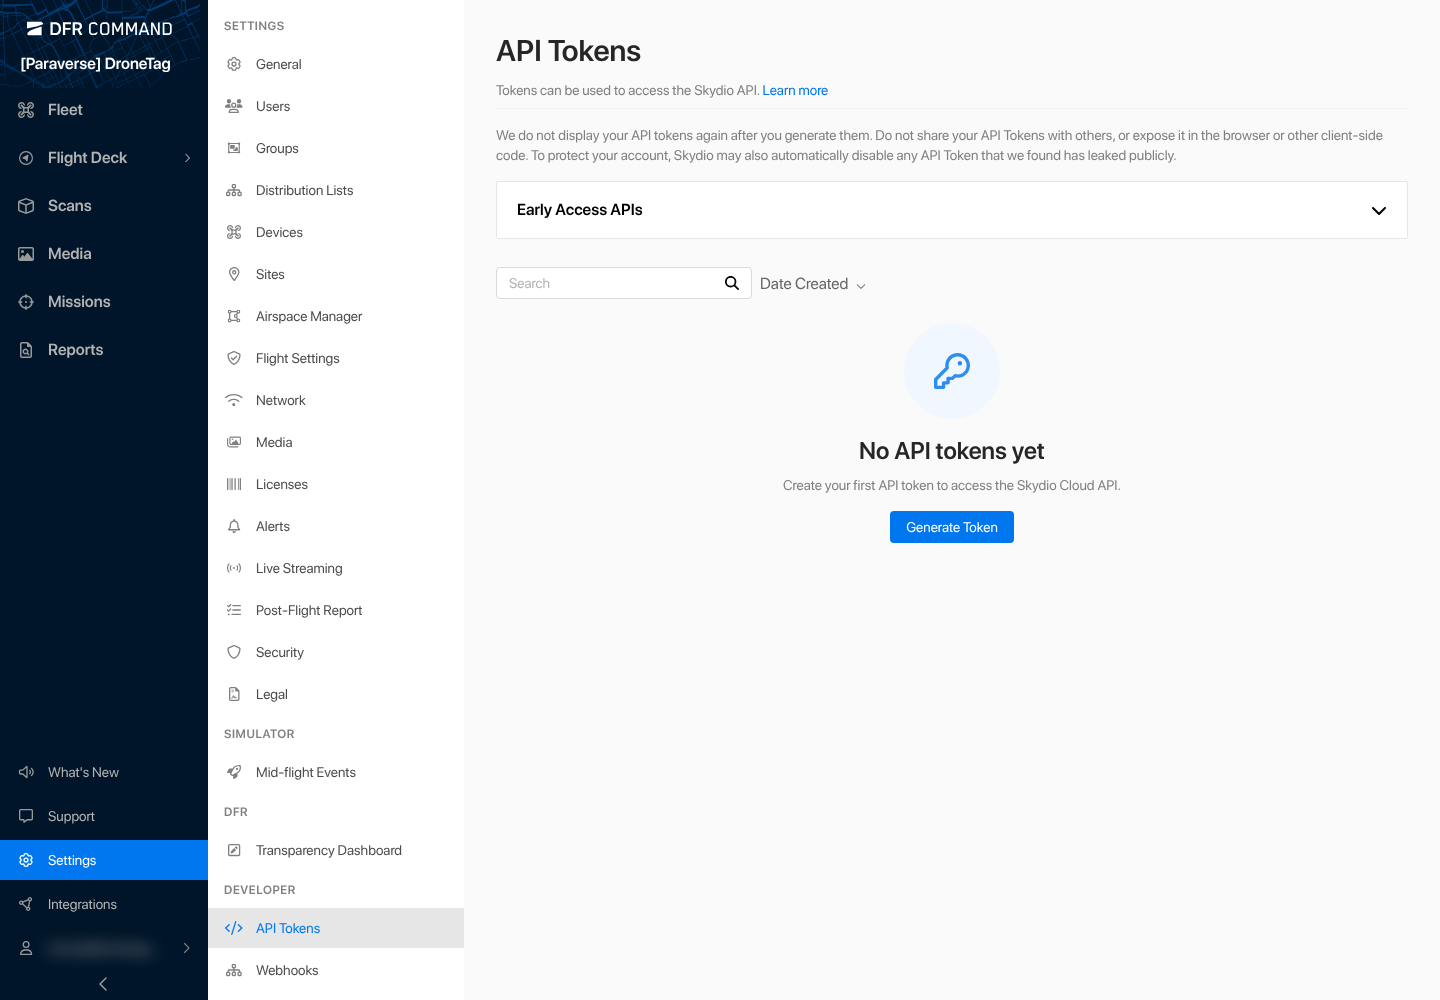
Go to Settings, then API Tokens under the Developer section, and select Generate Token.
-
Give the token a Token Name (e.g.
Dronetag Scout). Leave Groups at its default of your entire organization unless you restrict Skydio access by group. -
Under Permissions, set Markers to Read and write (this integration creates, moves and deletes markers) and Whoami to Read-only so the token can identify itself. Leave every other permission at No access.

-
Select Generate, then copy your token and store it in a safe place. Skydio hides it permanently after the page refreshes or your login session expires. Keep it secret - it grants access to your organization's data in Skydio Cloud - and per Skydio's guidance, do not reuse the same token for multiple integrations.
Configuration
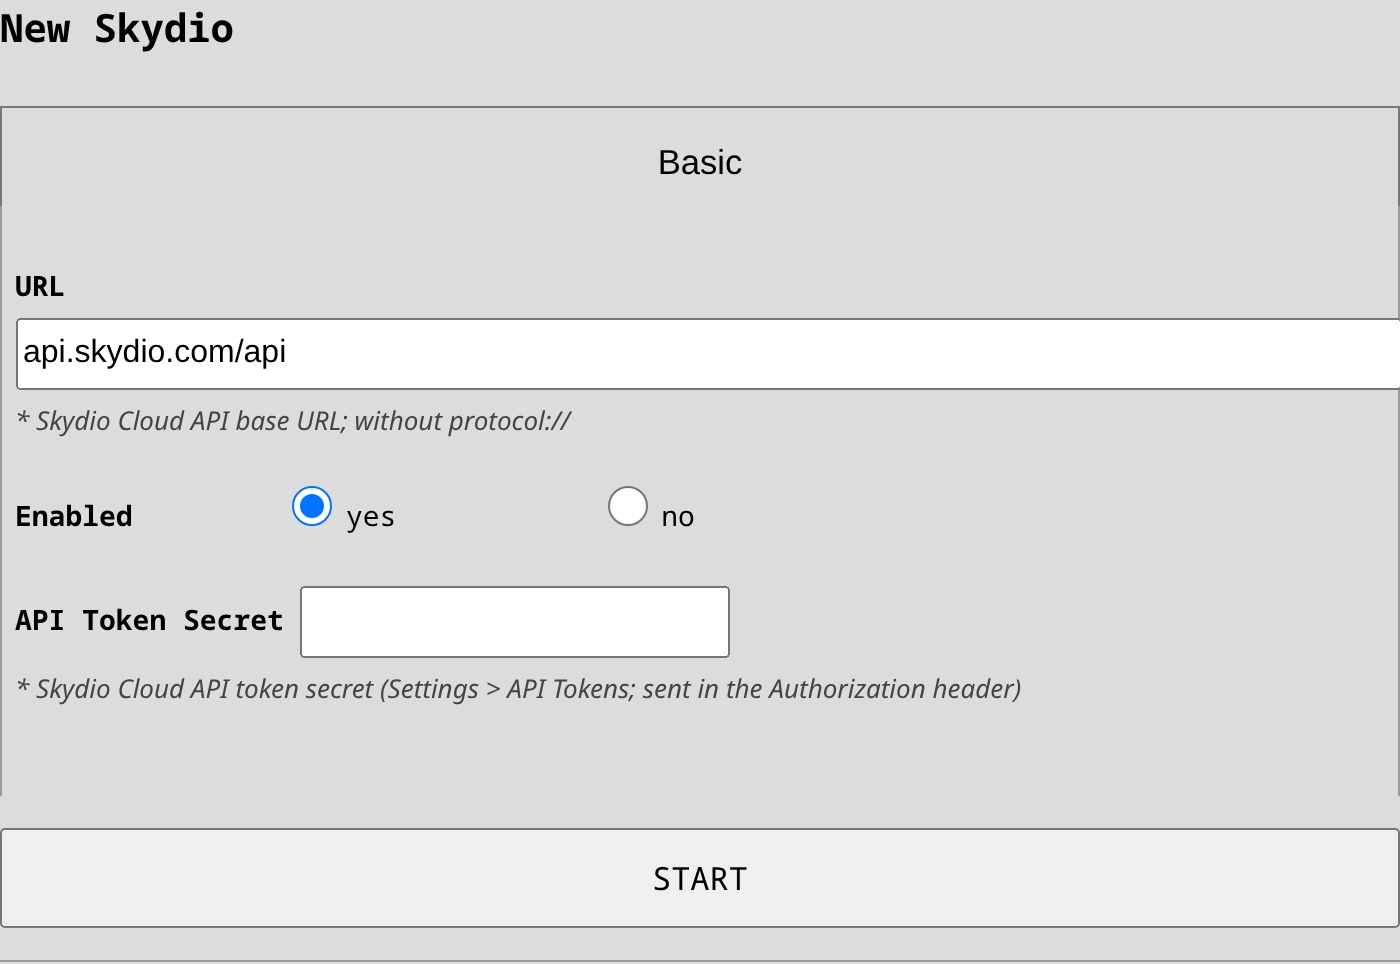
- In Scout's UI, head to Forwarding and add the Skydio integration.
- Paste the token into the API Token Secret field (Skydio Cloud shows the value under this name).
- Keep URL at the default
api.skydio.com/apiunless Skydio gave you a different environment (e.g. a trial/staging instance). - Drone detections are pushed by default; for most deployments there is nothing more to set. The options
below are advanced and appear only in expert mode:
- In Sources, check
aviationif surrounding air traffic should be pushed as well, and checkstatusif you want to use "Marker for this Scout". - Marker for this Scout (off by default): when enabled together with the
statussource, the Scout itself appears on the DFR map as a marker named "SCOUT-<last-4-digits-of-serial-number>" at its GNSS position.
- In Sources, check
Upon saving, the integration verifies the token with Skydio, shows the organization it is connected to, and switches to the "AUTHENTICATED" state. It then re-checks once a minute, so a later problem - a revoked token or a dropped connection - surfaces within a minute even when no detections are flowing. If the token is rejected, re-check that it was copied whole and that it carries the Markers permission.
Skydio Data
Skydio Markers are persistent objects. Scout creates one marker per detected object and moves it in place as new detections arrive (at most ~5x per second per object, so a spoofed track cannot flood your Skydio Cloud). A drone seen on a later day gets its own marker, so past days are kept rather than overwritten. Scout does not delete markers - they remain on the map and are re-used the next time the same object is seen.
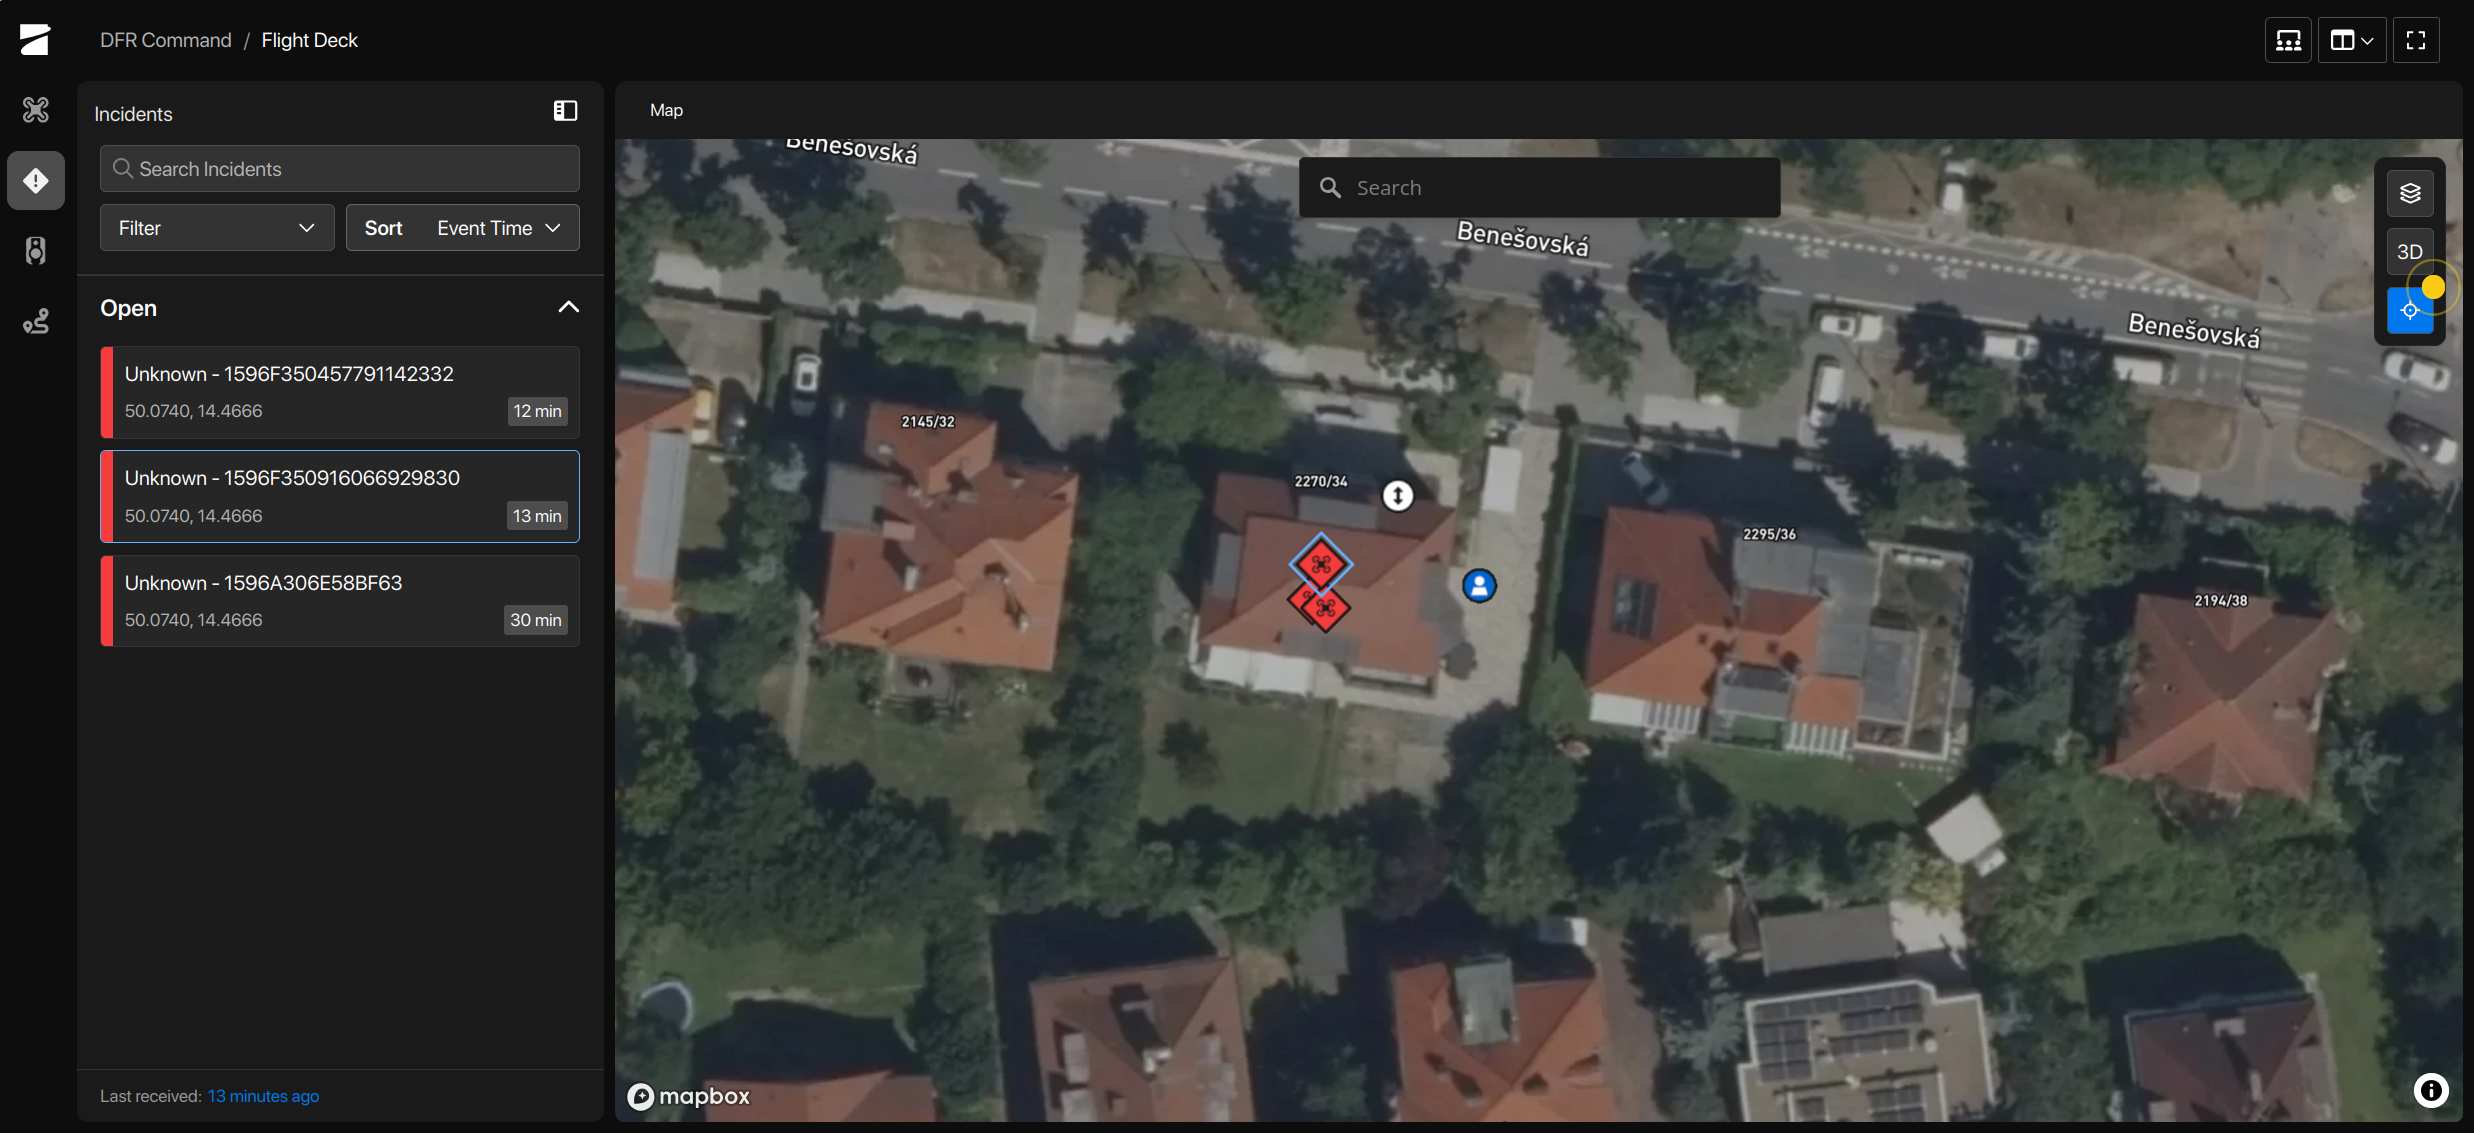
Drones
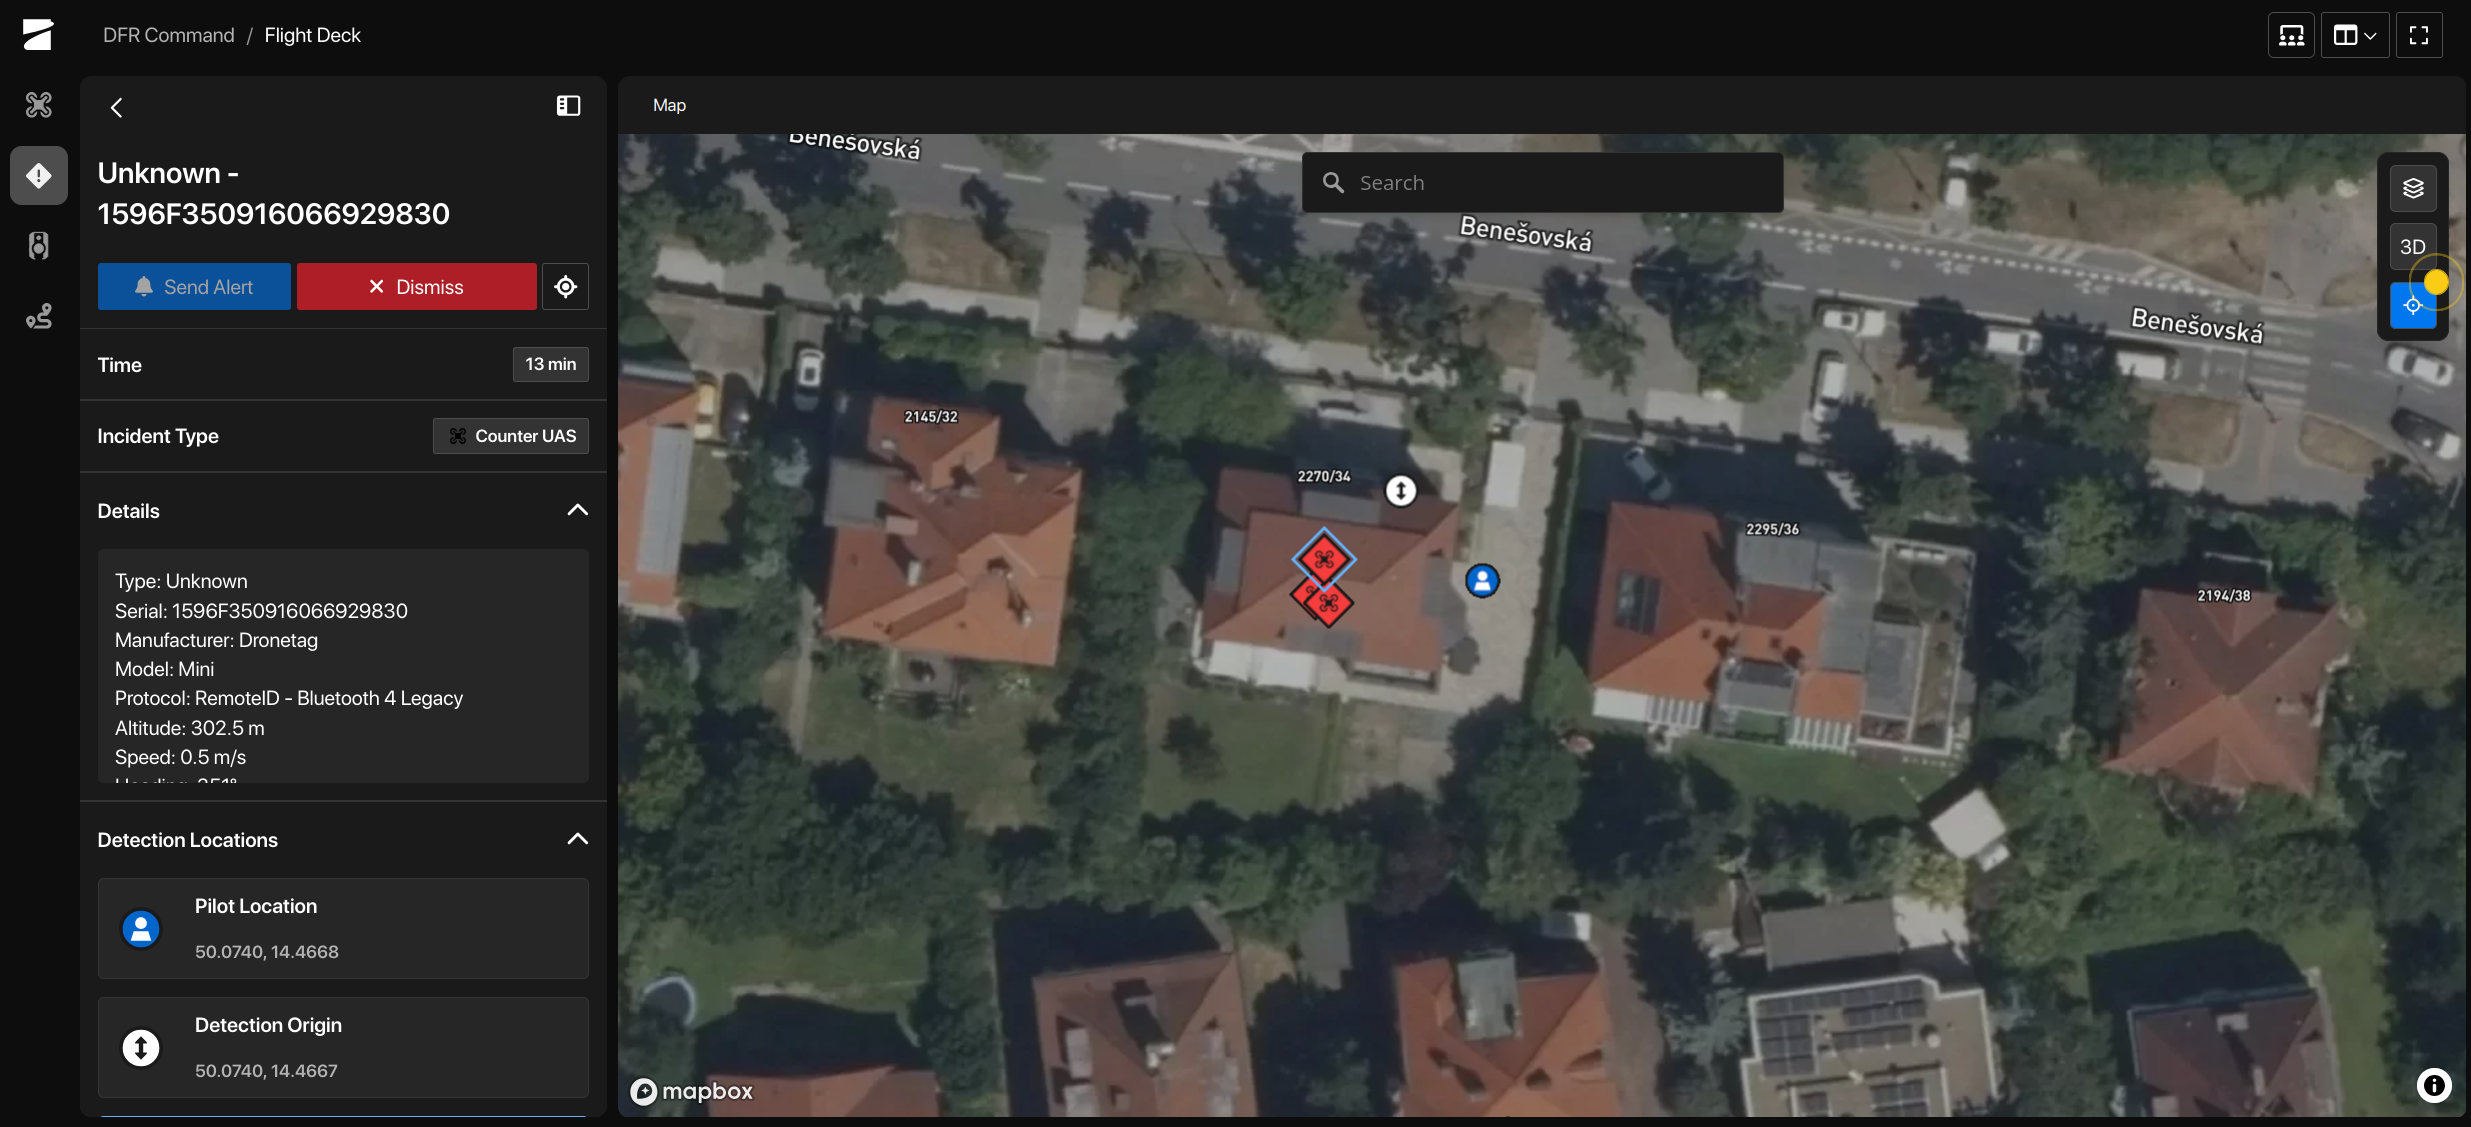
Each drone is pushed as a UAS detection marker titled <type> (Drone) - <serial>, e.g.
Multirotor (Drone) - 1596F319B877381F1BBF. The marker carries the drone's position, altitude, speed and
heading, the RF protocol it was detected on (Bluetooth 4/5, Wi-Fi Beacon/NaN), and the serial number. When
the drone broadcasts its operator's location, the pilot position is included on the same marker - Skydio
shows it as part of the UAS detection, there is no separate operator marker.
If your Scout carries the RID identification database, the manufacturer and model resolved from the serial number (e.g. "Autel Robotics EVO Nano+") are filled into the marker as well.
Status
With "Marker for this Scout" enabled, a single incident marker keyed to the Scout's serial number shows the sensor's own location, altitude and the list of its detection technologies on the DFR map.